ACES 2.0 CAM DRT Development

I think we need it on the way in, so Unity values end up with a zero M value, but I’d have to check again.

I removed the seperate ApplyCAT from the code path coming into Hellwig at some point, as I never succeeded in getting M down to zero… But maybe that was the wrong move?

Yeah, I’m not sure either, I’ve never really understood what the discount illuminant does and when it should or shouldn’t be enabled.

One note about the v25 is that the HK mode has a huge impact on brigthness of colors. I dislike what it does to reds and greens. Greens great really bright, as if they’re not bright enough already, same for reds. It brings up more noise as well. The HK mode didn’t have this much of an effect with previous versions.

What is the HK mode supposed to change? What it seems to do is to brighten colors by a half a stop or so (compared to HK mode disabled). Seems really strange what it’s doing now, can’t imagine it should have that big of an impact. I like Hellwig colors better without the HK mode.

Edit: I think it’s wrong to apply HK only on the way in (XYZ_to_JMh) and then not do that on the way out (JMh_to_XYZ).

A few observations on ACES 2 candidates version 025
DaVinci Resolve 18.1.1
Using B: Stock DaVinci YRGB project with manual ACES node
with display LG OLED55C8PCA via BMD DeckLink 4K Extreme 12G

There might be an issue with the Chromaticity scope in Resolve as colors are not contained within spaces indicated as expected.

P3D65 vs P3D65(Rec709sim) - Display at SD
++ higher saturation than P3D65(Rec709sim) shown on scopes for all samples, and very noticeable in images such as 0058 (green-screen), 0060 (red x-mas), 0061 (2020 colors), 0062 (light sabers)
++ no change in grey ramp curve, but colors do change. For example, reds and greens in 0029 and others mentioned above.

Rec2100 vs Rec2100(Rec709sim) - Display at HDR
++ All colors from images with Rec2100 seem to become less saturated in some images (example:0074) while not in others (example:0062).
++ Blue shifts even further magenta from the P3D65 and Rec709 groups, best seen in 0057(blue screen)

ACES2.0 Rec709 vs ACES1.3 Rec709 - Display at SD
++ In comparison with ACES1.3 Rec709 with a grey ramp the gamma of the curve seems to be changing in several places, especially in the lower (darker) end. Would it be correct to assume that all this “bending” of the ramp’s curve is due to the saturation compression? But then, why would a neutral grey ramp even be compressed for saturation? I would think that the compression algorithm would work similar to a dynamic EQ in that it would compress where, when and as needed.
++ All images seem “better”, however I am not sure if this is because of various contrast changes throughout the dynamic range. I would rather have more accurate than better.
++ Blues and Cyans do lighten and the blue screen (image0057) goes toward magenta.
++ There is also a big change in the green screen (image0058).

Again, these observations are when using Resolve and am not sure if similar when using Nuke.
Good work and lots of progress. Looking forward to more as refinements are made.

1 Like

I think something’s strange with the gamut mapper in v25:

v25:
v25
v24:
v24

This happens with or without HK mode enabled or any combination of them. It happens with ZCAM as well.

Testing my new chroma compression with rec2100 HDR in v25, I also saw purple extending to ACES max with reds, blues and magentas, and took a picture:

I haven’t tested Hellwig in HDR before so I don’t know whether that purple’s been there before, but it is not with ZCAM and v24.

Actually this was my bad in merging the chroma compression to v25. Will re-check the ACES ramps for that purple later…

1 Like

One of the things I was really enjoying before 25 (with 24) was the darker and maybe truer blacks. Under about 7% luminance 25 has started to pump up the values. Both of these are made in Resolve.


1 Like

Hi, for anyone playing along in Resolve using the ACES Transform FX plugin, I have found an issue where if you add the plugin directly to the node tree (instead of applying it to an existing node) the plugin/fx node is ignoring the 3DLUT interpolation method and always using trilinear.

Attached are screenshots showing the ACES Transform plugin using the latest v025 709 ODT when added to an existing node (and using tetrahedral interpolation), versus dragging the FX plugin from the palette to the node tree and creating a new node (still set to tetrahedral but gets ignored and uses trilinear instead).

I’ve reported this to the Resolve team (I’m from the cameras team) who will address it in a future release. For now, please add the FX plugin to an existing node to avoid this.

4 Likes

I’m generally in favour of a more soft start look. Being able to see more in to the blacks etc. as a starting point for a grade. ACES 1.0 was too contrasty in my taste (and many other colorists I know) and always had to fight against that when setting my look. I think it’s better to add contrast than having to reduce it.

And VFX supervisors I know also wants to have a more “technical” start look to able to see/judge your VFX work better.

I dont think the initial look of v25 vs v24 should be the benchmark of how they perform. I think doing grade testes, SDR vs. HDR, etc. should. But I’m coming from a place where we at our facility always have look/LMT in our pipeline for our ACES projects (dailies, VFX, starting point for grade) so its not so important to us.

1 Like

I pushed v26 of CAM DRT to my prototype DRT repo (as well as opened a pull request for @alexfry).

That version now adds an invertible chroma compression mode, replacing the old one. The goal of this mode is to achieve following:

  • Have neutral rendering throughout the exposure range. In previous versions the rendering became typically warmer at higher exposures. This brought a warm color cast into the image. Colors near the achromatic axis also expanded as exposure goes up, bringing undesirable colorfulness to neutrals (whites and grays). This should now be mostly gone. Image appears less colorful as a result.

  • Have better match between SDR and HDR. In my testing I’ve managed to convince myself that the match is better now, but I am eager to hear how people now find the match. I’ve tested Rec.709, Rec.2100 P3 limited and Rec.2100 Rec.2020 limited. With Candidate C SDR was much more colorful than HDR. v26 SDR is now less colorful than Candidate C SDR.

  • Hopefully have better skin tones.

The technique itself is highly adjustable so it is easy to add more colorfulness or remove colorfulness. I was quite conservative and SDR, for example, doesn’t stay crazy colorful in the highlights. It is still significantly more compared to Candidate C. I also added a global saturation control to play with.

v26 disables HK mode by default. I did the compression on top of v24 which had broken HK mode, and I think HK mode in v25 has issues too.

2 Likes

A few more observations on ACES 2 candidates version 025
DaVinci Resolve 18.1.1
Using B: Stock DaVinci YRGB project with manual ACES node
Note: I am adding the ACES transform to an existing node.

computer 1)HDR
Windows10 with display LG OLED55C8PCA via BMD DeckLink 4K Extreme 12G
computer 2)SD
Windows10 with ASUS ProArt Monitor calibrated to Rec.709 and Decklink Mini Monitor 4K

ACES2 computer 1)
P3D65(Rec709sim) vs Rec709
++ in general each image shows some lift (enough that middle grey also lightens) and shows the compressed saturation
++ watching Vector Scopes the hues seem to stay constant.
++ in particular the Lapis blue hue looks to remain constant (even though luminosity is increased) while the blue screen (0057) shifts toward magenta.

R2100 HDR & Rec2100(Rec709sim)HDR on computer 1 vs Rec709 SD on computer 2
++ the Rec2100(Rec709sim)HDR image looks too dark even when the scopes say it reaches almost 100 nits … [the Rec2100 version looks consistent with what the scopes say.]
++ using a grey ramp Rec2100(Rec709sim) shows max of 48 nits and Rec2100 104 nits. I am puzzled as to why this is so. [Note that Rec709 SD approaches 100 nits with images that do so as expected.]

Yeah that makes sense too. I feel like I am always bringing the blacks down so it makes more sense to start with a crisp low end. This rev had a nice softer midtone and highlight feel, less contrasty than the old ODTs but still deep blacks.

ACES version 1 to 1.3 Rec709 output and Rec2100 PQ never felt like their blacks matched but Rev24 did have the same low end. I’m about to start post on a few shows and experimenting with these ODT revs to see if I can use some ACES 2 developments sooner. So far this one (24) is my pick for an HDR grade that can go with the least changes to SDR.

1 Like

For context I should try and post a little bit here about what “HK_mode” does.

The paper it’s based on can be found here:
https://onlinelibrary.wiley.com/doi/abs/10.1002/col.22793

Abstract

Increasing the purity of a visual stimulus increases its brightness, even if the stimulus luminance is held constant. This perceptual phenomenon is known as the Helmholtz–Kohlrausch (H–K) Effect. This paper reviews published experimental data and models of the effect. Using past experimental data, we derive a modification of the CIECAM02 and CAM16 color appearance models to account for the H–K effect and compare the proposed model to other models. Finally, we discuss the need for further experimental data on the H–K effect to refine the proposed model.

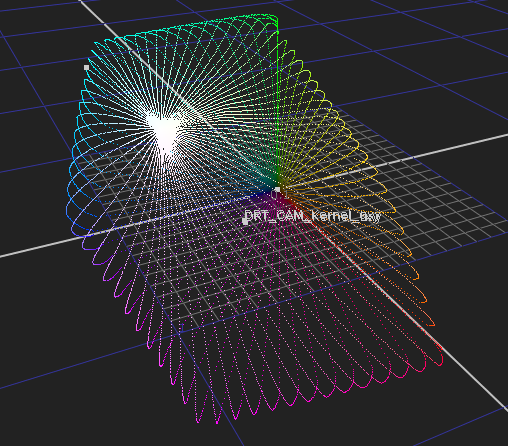
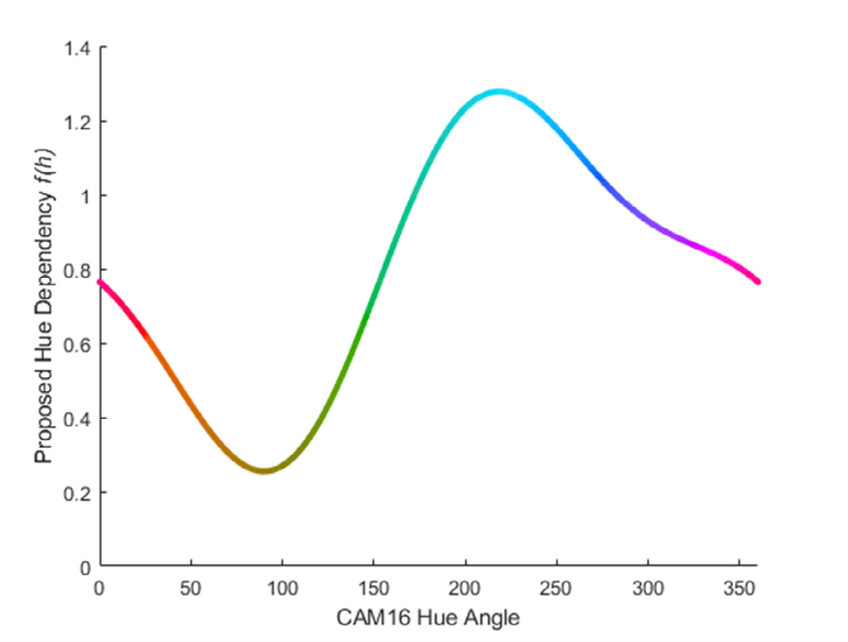
Based on my rough undertsanding of the code (As per usual, I’ve mostly cargo culted it from @Thomas_Mansencal’s implementation) it’s Increasing the value of J as M increases, with h as a varying factor. The graph below (from the paper) shows how some h angles, like cyan at 220, get a much larger boost than yellow at 90.

        // # *Helmholtz–Kohlrausch* Effect Extension.
        float J_HK = J + hue_angle_dependency_Hellwig2022(hr) * spow(C, 0.587f);

  float hue_angle_dependency_Hellwig2022(float h)
  {
    return float(         \
     -0.160 * cos(h)      \
    + 0.132 * cos(2 * h)  \
    - 0.405 * sin(h)      \
    + 0.080 * sin(2 * h)  \ 
    + 0.792               \
    );

I think where we were getting into trouble earlier is that the path looked something like this:
• XYZ → JMh
• J get’s varied by HK effect
• Tonemap is applied to J
• Compress to gamut boundry (boundry also found with HK varying J)
• J get’s inverse HK effect applied
• JMh to XYZ

From what I can tell, goosing J up and down with the tonecurve application, and the gamut hull finding, was causing issues, as was pulling J up and down again right before we go back to the final target gamut.

Whilst I’m pretty convinced that disabling it for the gamut hull finding, and the final trip back to XYZ are a win, I’m a little torn about having it enabled on the way in.

Visually it’s actually making the whole tonescale feel significanly lower contrast (even though it hasn’t changed for pure greyscale values).

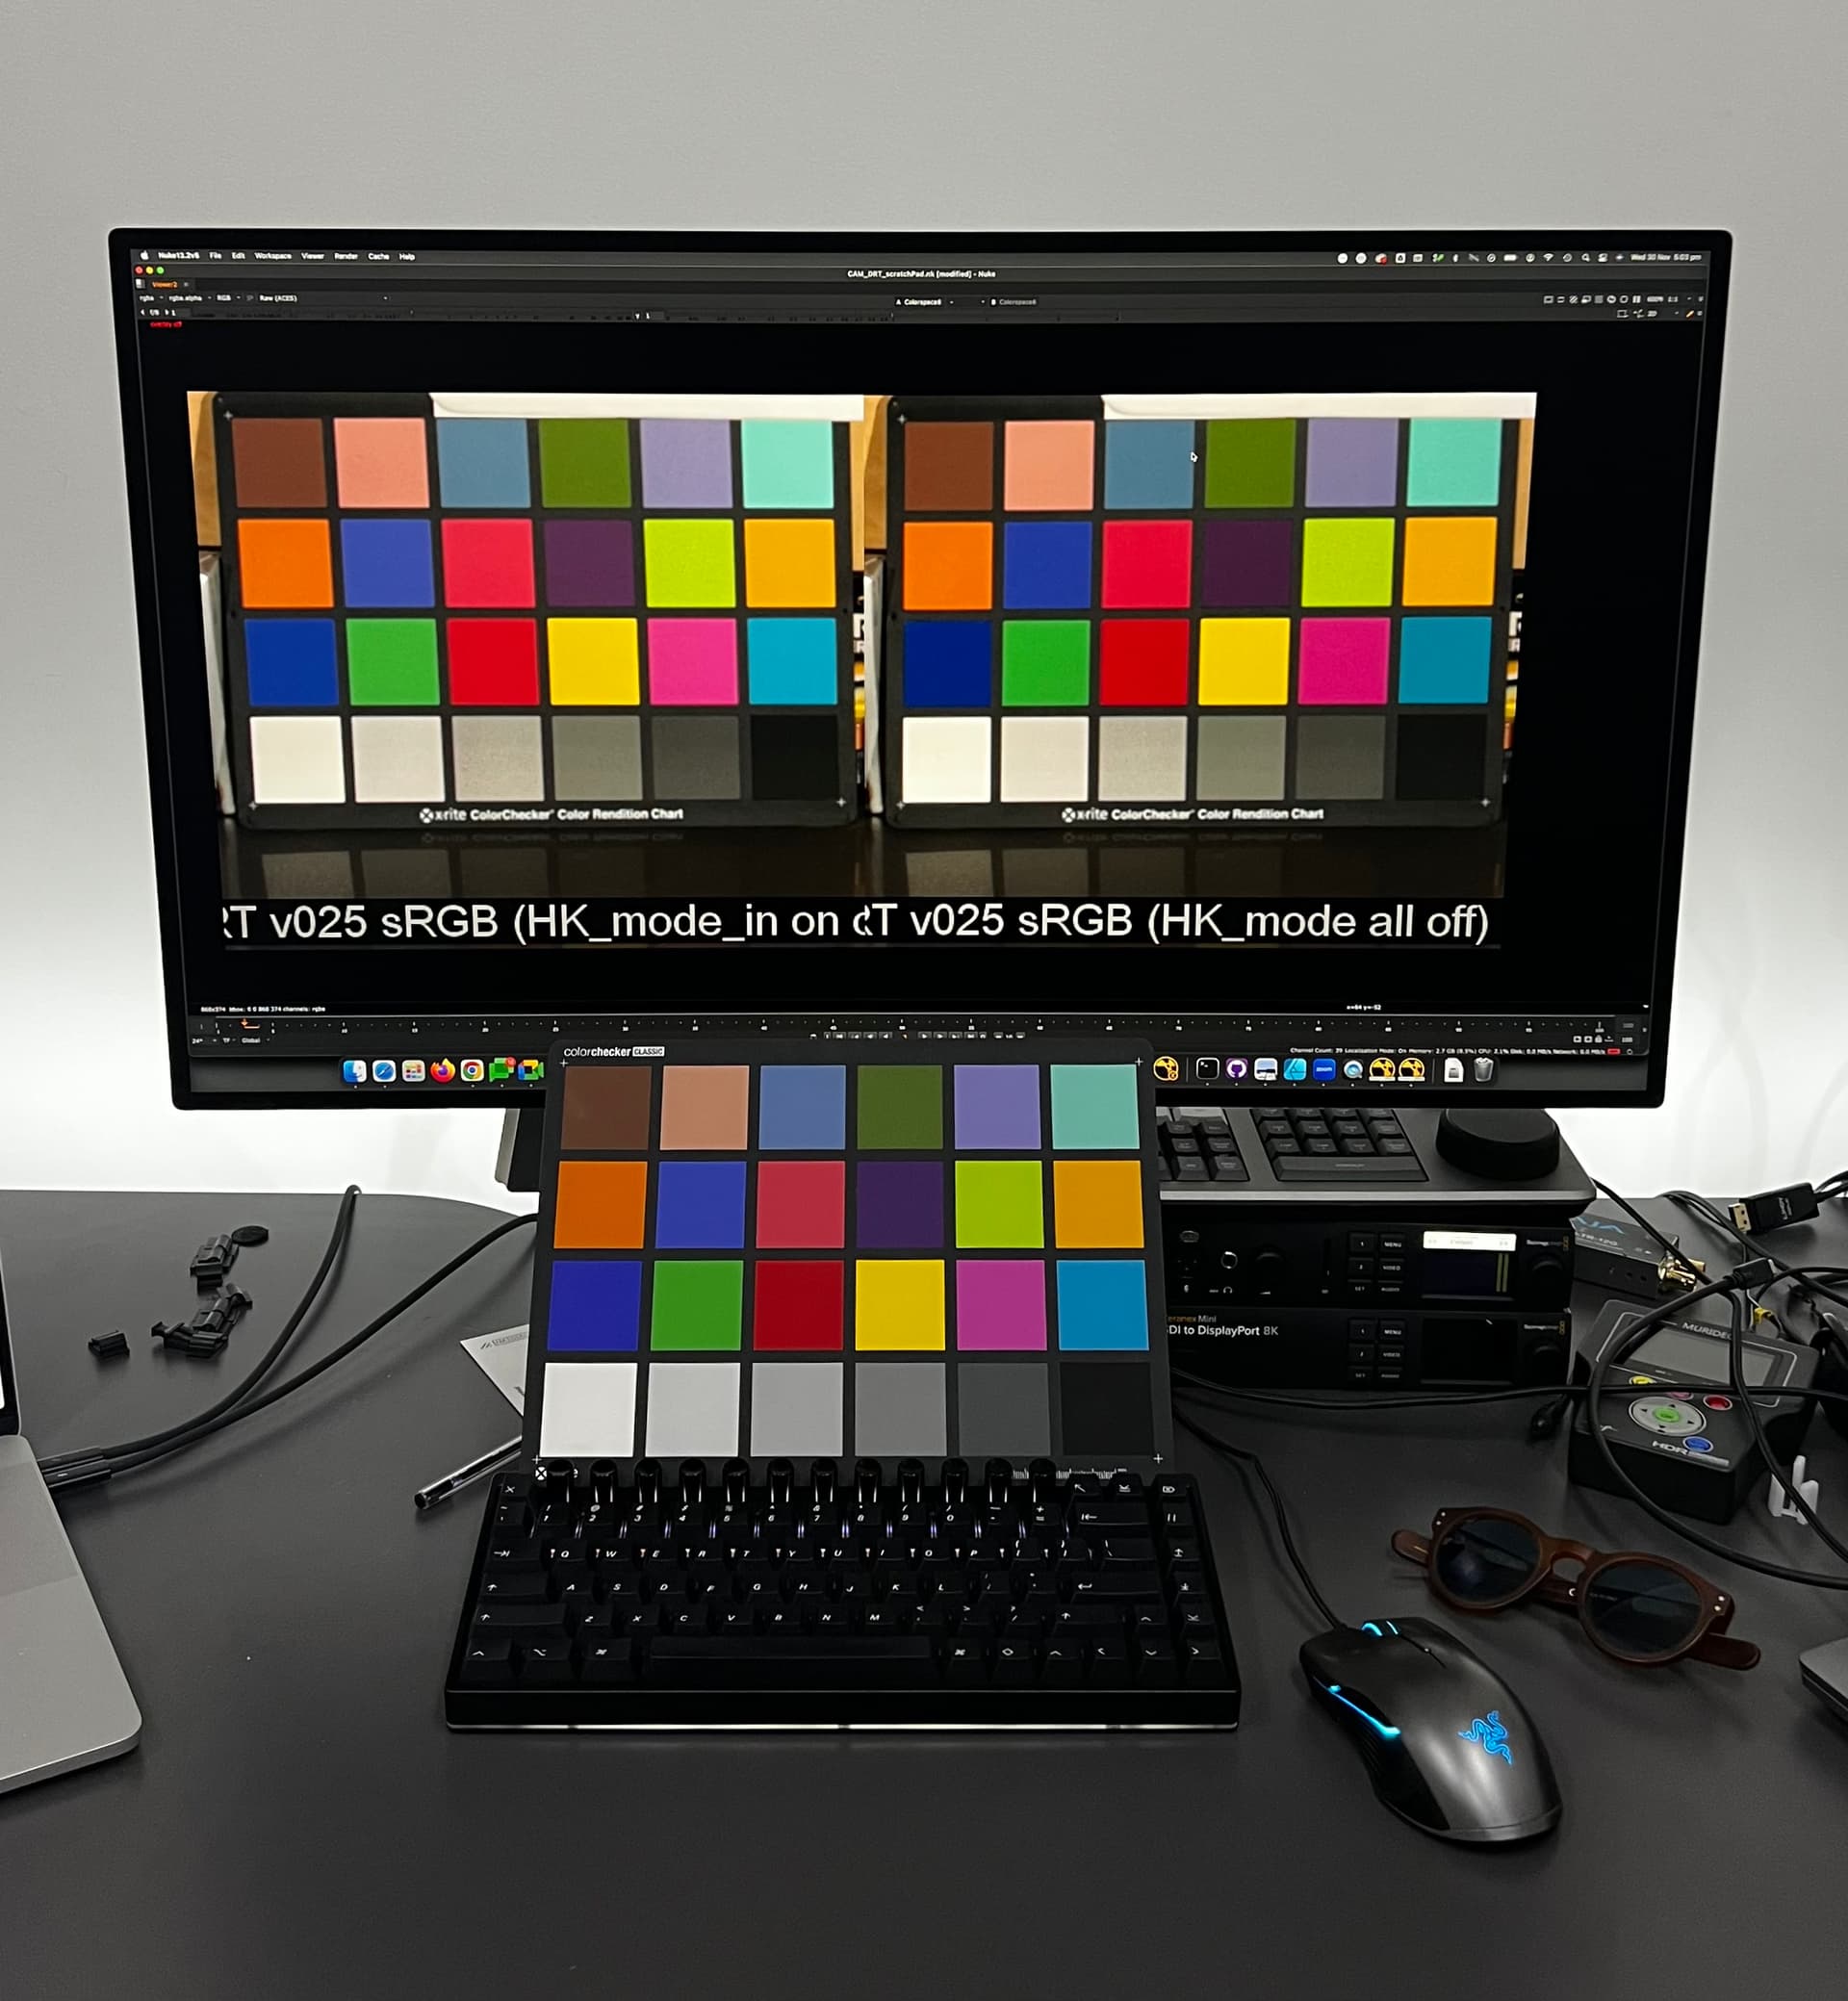
One area where I have been able to talk myself into thinking it’s an improvement (I’m not fully convinced, but it’s interesting) is when comparing the percived brightness of a macbeth, compared to a straight averaged greyscale version passed through the same transform.

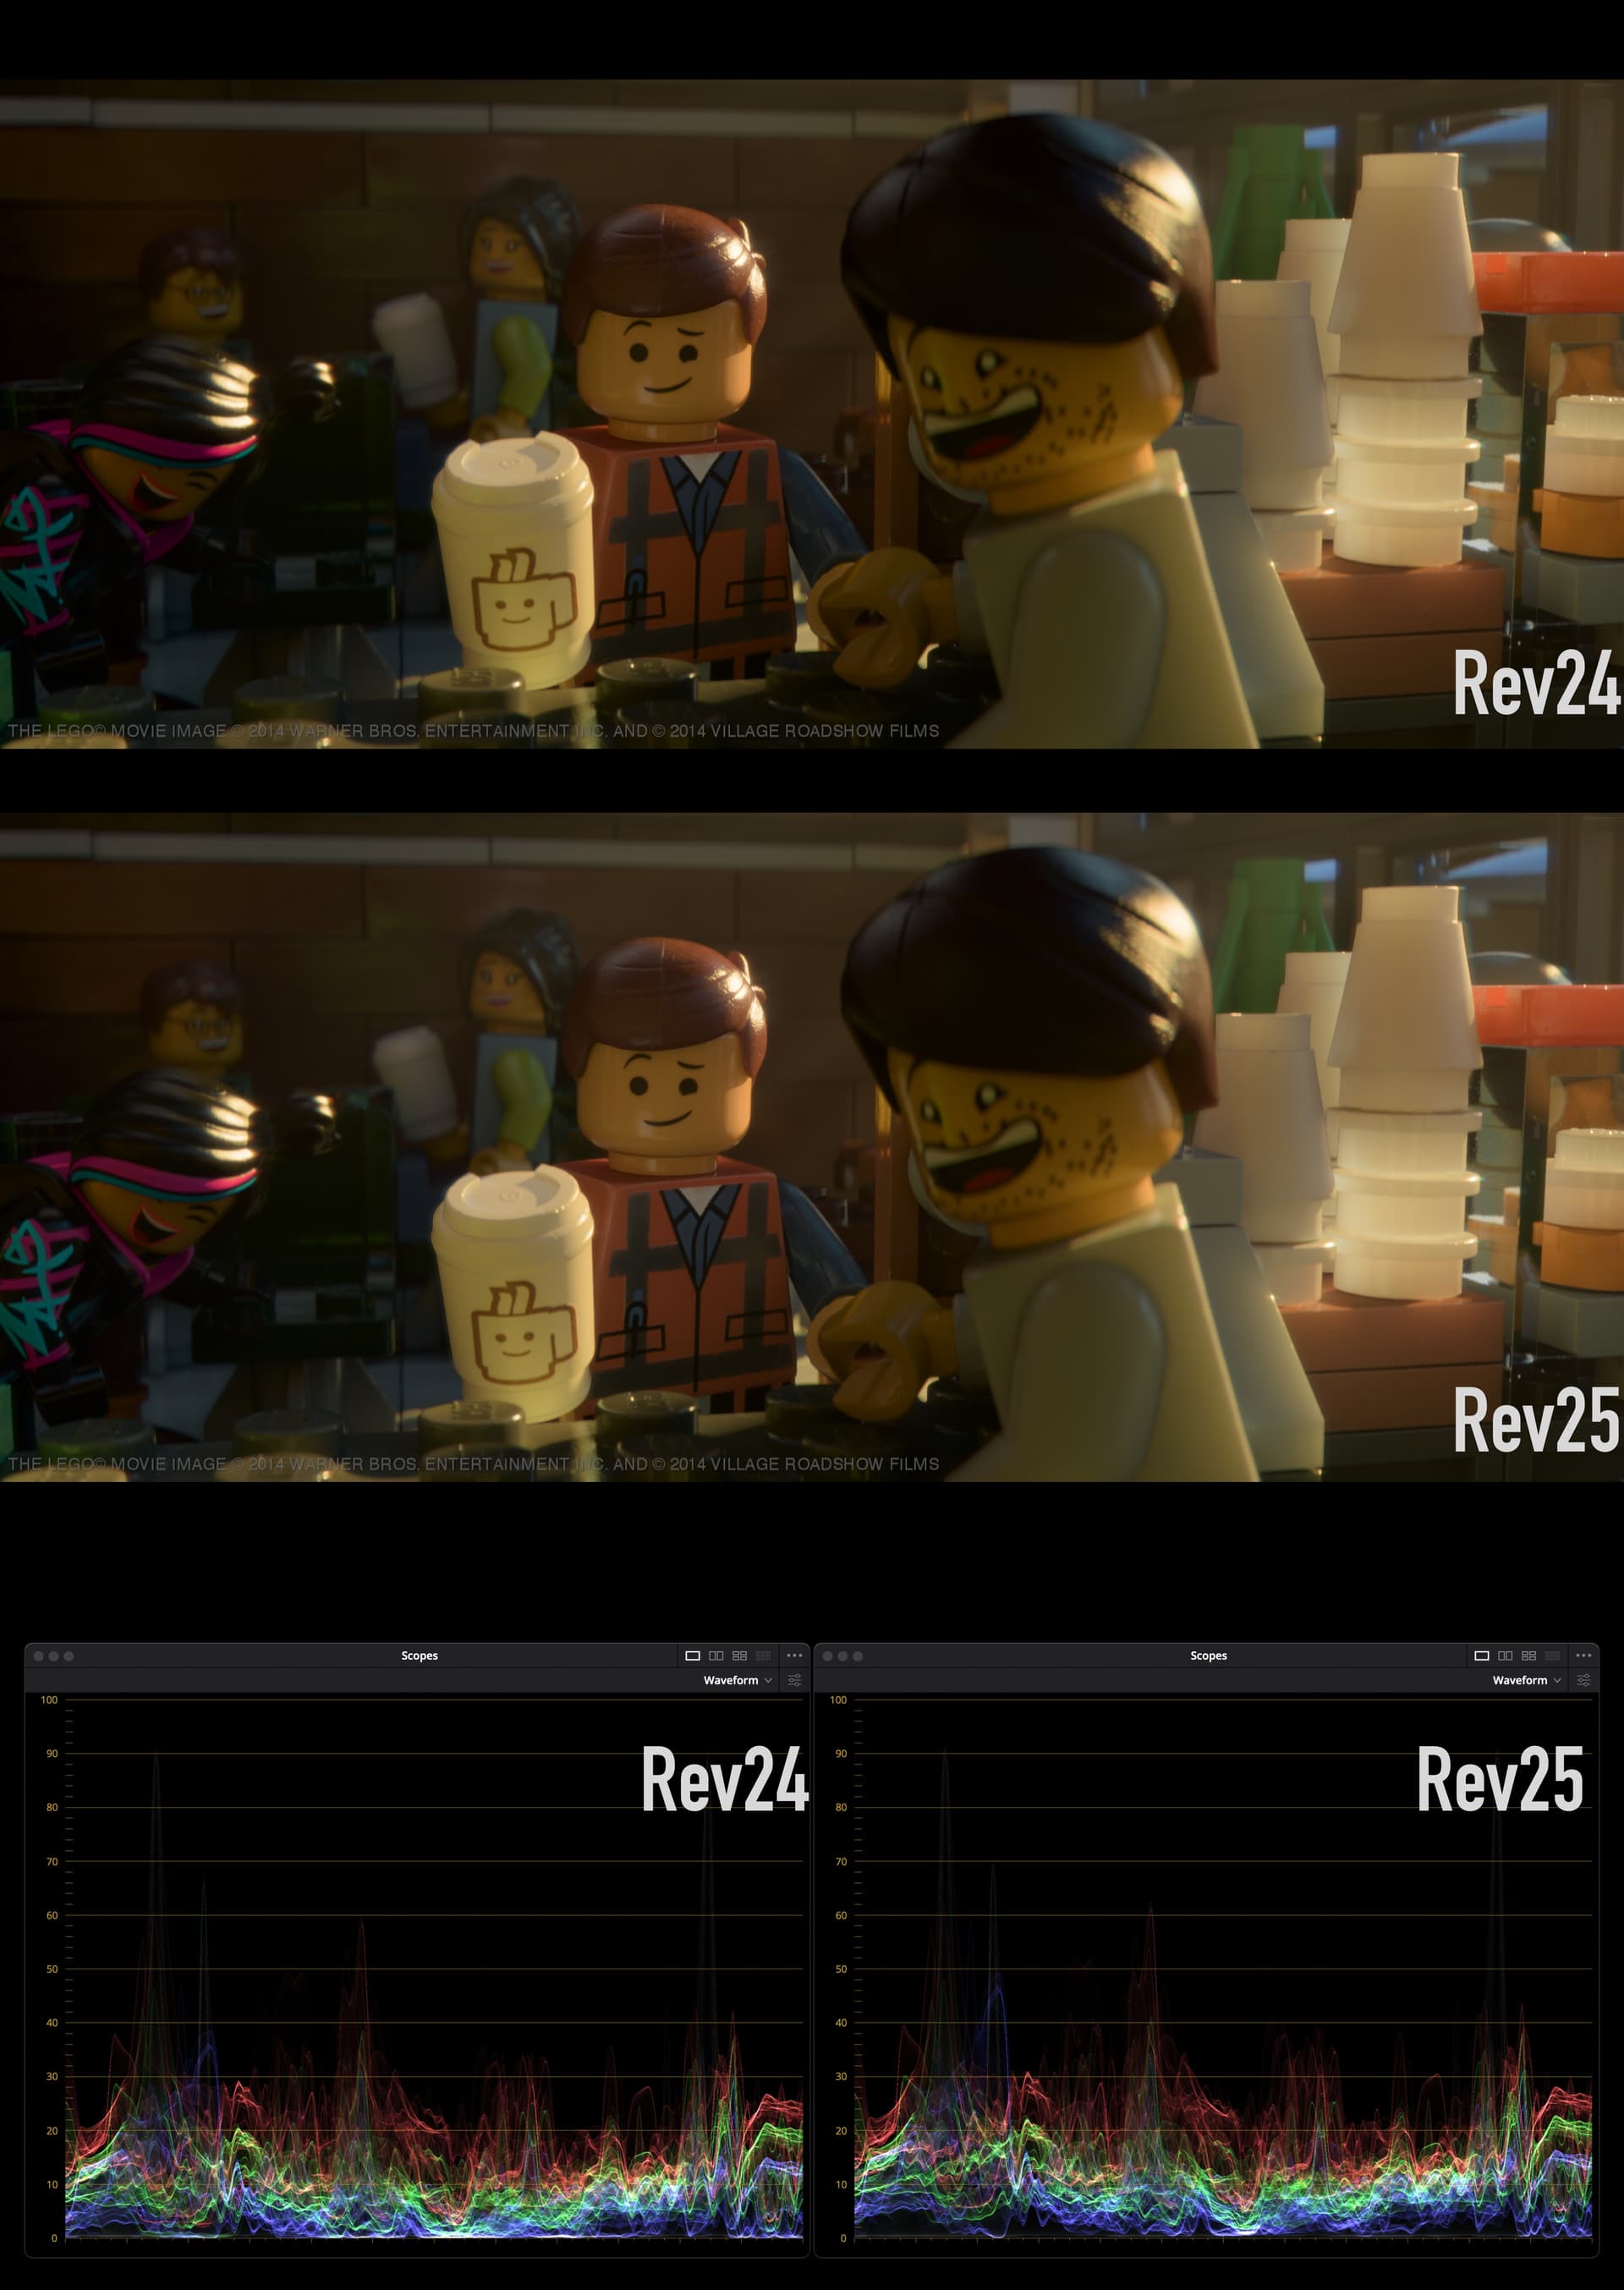
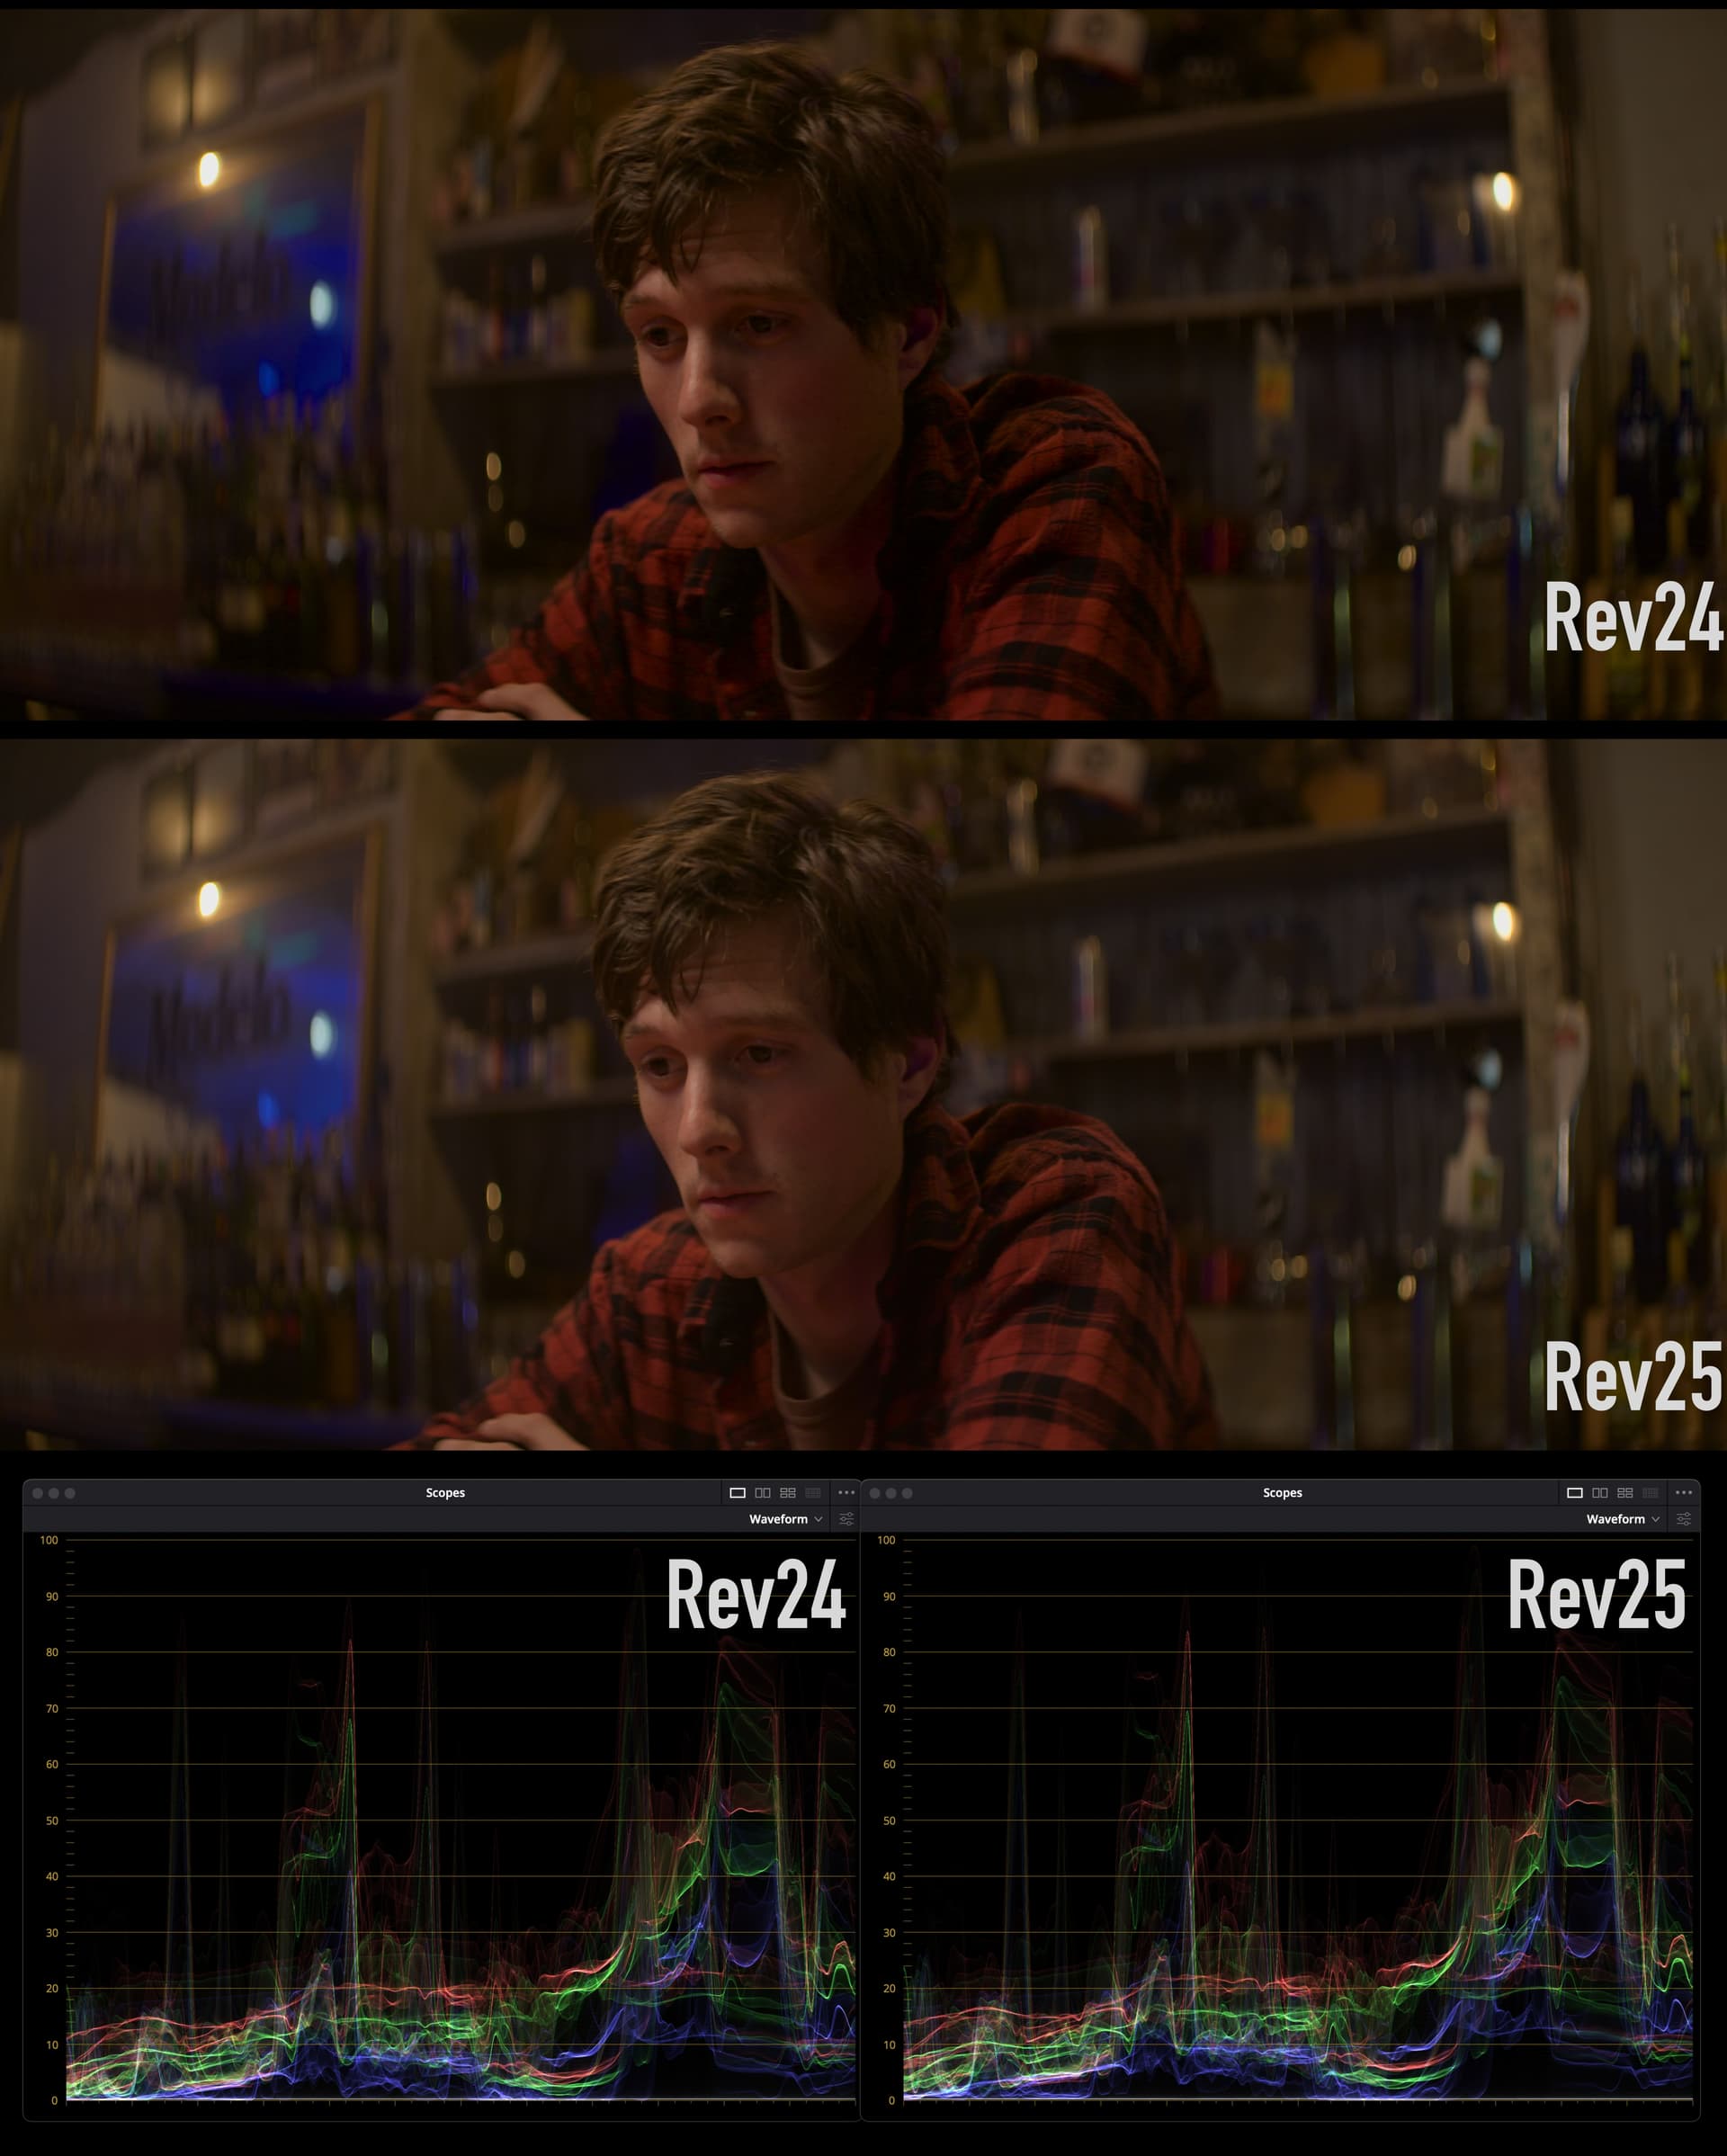
First example shows HK_mode_in enabled:
(These are animated gifs, but depending on the browser you might need to click them to toggle the comparison)
HKinOn_1

Whilst the second on shows HK_mode off at all stages:
HKinOff_2

With it off, I feel like the full blue patch is sucking lighting out of the scene, whilst I feel like with it on the percerived brightness of the colour version and greyscale version are much closer.

Now is this even a valid comparison? Is this a good idea that just needs to be dialed back by 50%? I’m not sure.

1 Like

Doing a Science? :man_shrugging:t2:

No, not an actual science……
But there is something here.

4 Likes

But isn’t the model different then on the way back to XYZ than it was going into JMh? Isn’t the idea to do things in the model space and then come back the same route?

I’ve also looked images where I have reference of how the colors should look like (groundtruth image available) and only doing HK on the way in makes the colors way too bright. The image gets brighter, almost like the exposure changed, but it didn’t.

Based on that hue dependency curve, what is supposed to happen to greens? Should it get brighter or darker? I’m asking about green because for me it feels wrong that green would be the one that gets most boost with HK, which is what is happening currently (especially in shadows).

I’ve updated the LUT repo with some 3 new versions:

  • rev025 - CAM_DRT_v025.blink with HK_mode_in enabled
  • rev026 - CAM_DRT_v026.blink with HK_mode_in disabled
  • rev026b - CAM_DRT_v026.blink with HK_mode_in enabled
2 Likes

Yeah, I’m not totally convinced myself that this is the right move either.

I’m curious what you mean here.
“groundtruth” as in a different digital rendering of the same pixels? Or the real subject physically in front of you?

Images graded to match. But I do have colorchecker as well as a colorful bookshelf, so I could do live experiments…

1 Like

I too think that the effect of the HK boost is a little too much when used only on the way in, although it makes logical sense to me that it should only be used there. I’ve been playing with a modified version of the (v25) Blink where I have an additional parameter to scale the size of the HK modification. Totally non scientific, but splitting the difference between with and without it sits things in a comfortable place to my eyes.

It occurs to me that we might benefit from something similar for other aspects, like surround compensation, as the default change in the CAM is rather dramatic. It has been noted before that while a large modification may be appropriate to create an appearance match with solid colours, something smaller may be more appropriate for images.

On the question of when to apply H-K, conceptually we need to determine if we are trying to model a virtual device appearance, or if we want to model real life appearance, or both, i.e. do we expect to model the appearance at the known display intensity, and thus we may expect the modelling to need to know the absolute luminance to correctly calculate the effect, per output transform. That would suggest we should apply the effect once, in an unconstrained sense before applying gamut compression, etc, though obviously the application of the gamut compression plays with the effect.

I came across some more papers on H-K thought this one might be interesting - though not directly applicable to us

2 Likes

Hi @alexfry , hi @priikone ,

I downloaded during the meeting last night the new configs and just checked the three versions with the A fully red star on a fully cyan background... in ACES - #12 by TooDee image once again in Nuke. Here is the file just in case. (HiDrive)
I just added a Blur Node with a value of 100 and viewed the result with three different OCIO configs (all only for Display P3 on an iMac27").

This is a strange “client logo” with ACEScg primaries :slightly_smiling_face: example.

I rendered out 4 jpgs with Rec.709 plus one display P3 screenshot from Nuke:

ACES 1.2 - Rec709 (halo as expected)
CAMDRT v025 - Rec.709 (a new dark halo)
CAMDRT v025 - Rec.709 (a new dark halo) screenshot - the P3 viewer shows me a different result
CAMDRT v026 - Rec.709 (no halo! dark or bright!)
CAMDRT v026b - Rec.709 (a new dark halo slightly different to v025)


I don’t what to make of it, but I am happy that v026 can render this unusual image without any dark or bright halos.

Maybe @priikone can explain why this suddenly works?

Thanks

Daniel

2 Likes