ACES-white destroys edges of Alpha

Hello,

I am currently working on a personal project and wanted to try out ACES here before using it in client work. Unfortunately, I have encountered an issue and haven’t found the answer to my problem here in this forum or other sites. (It’s probably answered somewhere but I haven’t found the right keywords)

I have a 3D Animation rendered in Houdini using Mantra with OCIO Set to ACES 1.2.
I use the same config file in Fusion to composite.
I imported my passes and have the ACEScg to Output sRGB viewer LUT active. Everything works fine until I want to merge my animation on top of a white background, which initially looked greyish due to the highlight roll of (as far as I understand what I have read here).

So I use the OCIO Colorspace Transform after my greyish background and set the Source Space to Output - sRGB and my Output space to ACEScg. Now the white has a value of about 16 and looks white in the viewer as well.
2020-09-29 01_03_52-Filme & TV

But when I merge my animation on top, the values of 16 completely eat away the edges of my Alpha.
I can decrease this effect by temporarily exiting ACES on my animation, merging it with my white Background in sRGB, and entering ACES again.
I attached two pictures.
One with the temporary exit and back to ACES:

And one that stayed in ACES:

As you can see, much more visible edges.

The question is, what mistake am I making, or is there a better way of handling this? I feel like this is an unnecessary amount of colorspace transforms for something this simple.

Thank you all very much for your help! If I’m unclear with something then I’m happy to add more information.

Hello @Noah2 and welcome to ACEScentral,

I have just done a couple of quick tests and have basically reached the same solution.
What I would do is to merge the white background in a display-referred state to avoid the values of 16 to mess with my alpha edges.

A constant of (1, 1, 1) in a scene-referred state would effectively be displayed at 0.8. A constant of (16, 16, 16) in a scene-referred state would be displayed at 1.0 because of tone-mapping basically. This is part of the ACES look.

In my test, I have added an OCIOColorSpace node ACEScg -> Output - sRGB on my exr render, merged with the white constant at 1 and then converted the whole thing back. This kind of operations (adding background of a certain clor) are usually operated in Photoshop for packaging and marketing.

Please note that merging/working in a display-referred manner would prevent you to use properly any nodes like Glow or Defocus.

Hope this helps,
Chris

Thank you @ChrisBrejon,
Very good to hear that you were able to reproduce it and that I didn’t screw up the color management completely.

If I understand you correctly, then my temporary transform to sRGB was the correct way of handling this?
It wouldn’t be an issue to add glow, defocus, and co before that transformation, but I am wondering if this would screw up any color grading that would happen later. (And possibly glows or blurs that a color grader might add)
As this is an animation that I want to have on a white background, I would prefer to keep the white background and send it in ACES to the grading, and not keep it in ACES, do the grading, converting to sRGB, and then adding in the background.

Very difficult topic, as I really like how my renders look in ACES (plus the advantages when dealing with real camera footage) but I am still struggling with tasks that I previously didn’t have to think about.

It would help me a lot if you (or somebody else) would still have the time to answer me these questions:

  1. As mentioned before, will converting my animation to sRGB and back to ACES screw up the color management and grading down the line?

  2. Will I lose any data this way? (In my testing it doesn’t seem like it but I rather ask to be save than sorry
    EDIT: Actually I have just tested this again and there are variations when I view it in the 3D Histogram. Some negative values are missing)
    Before the transform:

After the Transform to Output-sRGB and back to ACEScg:

Thank you!

Hi Noah,

on a project I ran into the same issue and we created a solution for Nuke at least. With Fusion I am not familiar.

As @ChrisBrejon explained, you need to think about “white” a bit different in ACES or with any 1D/3D-LUT workflow for that matter.

First you could render your scene in front of a which backdrop in the 3D scene. When enough light hits the wall, it will appear “white”. Think about filming your setup in a studio with a white backdrop. You need an enough even lit background that it will appear white in your camera.

While you are still working scene referred in your Fusion comp in ACEScg and use the view transform ACES/sRGB, you are already thinking that you are back in Photoshop where 255/255/255 in 8-bit is white. This can be only true after the view transform, because only then you can work again display referred.

The workaround in Nuke that we called “display-referred merge” takes you out of ACES and moves you back into it with a potential loss of dynamic range and an irreversible compression of gamut.

In Nuke you do the following steps:
ACEScg–>Out_sRGB

take off the sRGB gamma with a colorspace node
merge your 3D onto a “white” (1.0/1.0/1.0) background
apply again the sRGB gamma with a colorspace node

apply the inverse Out_sRGB —> ACEScg

Now you can view the merged result through the ACES pipeline. The white is now at 16.xxx, but your edges are fine. But remember you broke ACES chain by going scene referred–>display referred and back to scene referred again.

When this happens at the end of the comp it may be a good workaround.

I hope this helps

Daniel

Hi @Noah2,

So you are mixing Display-Referred and Scene-Referred workflows and the wedding does not go too well. You noted that the sRGB ODT maps ~16.3 to 1, and 1 to ~0.81 which is not desirable. If you want to stay in a Scene-Referred workflow and limit the issues with alpha, here are two other things to try:

  • Perform the merge in a Log space, or any space that will reduce energy, e.g. ST 2084, and then convert back to ACEScg
  • Reduce energy of the background with the inverse of the foreground alpha

From left to right:

Pseudo Display-Referred merge where background gets grayish, Scene-Referred merge where the background is mapped to pure white and the alpha is blown-out, ST 2084 merge, Background energy reduction merge.

set cut_paste_input [stack 0]
version 12.1 v1
BackdropNode {
 inputs 0
 name BackdropNode1
 tile_color 0x666666ff
 label "Pseudo Display-Referred Merge"
 note_font_size 42
 selected true
 xpos -710
 ypos -209
 bdwidth 210
 bdheight 280
}
BackdropNode {
 inputs 0
 name BackdropNode2
 tile_color 0x777777ff
 label "Scene-Referred Merge"
 note_font_size 42
 selected true
 xpos -380
 ypos -209
 bdwidth 210
 bdheight 276
}
BackdropNode {
 inputs 0
 name BackdropNode3
 tile_color 0x777777ff
 label PQ-Merge
 note_font_size 42
 selected true
 xpos -50
 ypos -209
 bdwidth 210
 bdheight 300
}
BackdropNode {
 inputs 0
 name BackdropNode4
 tile_color 0x777777ff
 label "Energy-Scaling Merge"
 note_font_size 42
 selected true
 xpos 280
 ypos -209
 bdwidth 320
 bdheight 276
}
clone node156d8d000|ColorWheel|31532 ColorWheel {
 inputs 0
 gamma 0.45
 name ColorWheel1
 selected true
 xpos 510
 ypos -129
}
set C56d8d000 [stack 0]
clone node181a23400|Noise|31532 Noise {
 gain 1
 gamma 0.07
 center {1024 778}
 color 0
 name Noise1
 selected true
 xpos 510
 ypos -57
}
set C81a23400 [stack 0]
clone node156d8dc00|Blur|31532 Blur {
 size 10
 name Blur1
 selected true
 xpos 510
 ypos -37
}
set C56d8dc00 [stack 0]
set N85e6bc00 [stack 0]
push $N85e6bc00
Shuffle2 {
 fromInput1 {{0} B}
 fromInput2 {{0} B}
 mappings "4 rgba.alpha 0 3 rgba.alpha 0 3 rgba.alpha 0 3 rgba.blue 0 2 rgba.alpha 0 3 rgba.green 0 1 rgba.alpha 0 3 rgba.red 0 0"
 name Shuffle1
 selected true
 xpos 400
 ypos -33
}
Invert {
 name Invert1
 selected true
 xpos 400
 ypos -13
}
clone node124586000|Constant|31532 Constant {
 inputs 0
 channels rgb
 color 16.3
 name Constant1
 selected true
 xpos 290
 ypos -129
}
set C24586000 [stack 0]
Merge2 {
 inputs 2
 operation multiply
 name Merge2
 selected true
 xpos 290
 ypos -9
}
clone node156d8cc00|Merge2|31532 Merge2 {
 inputs 2
 name Merge1
 selected true
 xpos 510
 ypos 39
}
set C56d8cc00 [stack 0]
clone $C56d8d000 {
 inputs 0
 xpos 70
 ypos -129
 selected true
}
clone $C81a23400 {
 xpos 70
 ypos -57
 selected true
}
clone $C56d8dc00 {
 xpos 70
 ypos -37
 selected true
}
clone node156d8c000|OCIOColorSpace|31532 OCIOColorSpace {
 in_colorspace scene_linear
 out_colorspace "Utility - Dolby PQ 10000"
 name OCIOColorSpace1
 selected true
 xpos 70
 ypos -9
}
set C56d8c000 [stack 0]
clone $C24586000 {
 inputs 0
 xpos -40
 ypos -129
 selected true
}
clone $C56d8c000 {
 xpos -40
 ypos -9
 selected true
}
clone $C56d8cc00 {
 inputs 2
 xpos 70
 ypos 39
 selected true
}
OCIOColorSpace {
 in_colorspace "Utility - Dolby PQ 10000"
 out_colorspace compositing_linear
 name OCIOColorSpace4
 selected true
 xpos 70
 ypos 63
}
clone $C56d8d000 {
 inputs 0
 xpos -260
 ypos -129
 selected true
}
clone $C81a23400 {
 xpos -260
 ypos -57
 selected true
}
clone $C56d8dc00 {
 xpos -260
 ypos -37
 selected true
}
clone $C24586000 {
 inputs 0
 xpos -370
 ypos -129
 selected true
}
clone $C56d8cc00 {
 inputs 2
 xpos -260
 ypos 39
 selected true
}
clone $C56d8d000 {
 inputs 0
 xpos -590
 ypos -129
 selected true
}
clone $C81a23400 {
 xpos -590
 ypos -57
 selected true
}
clone $C56d8dc00 {
 xpos -590
 ypos -37
 selected true
}
clone $C24586000 {
 inputs 0
 xpos -700
 ypos -129
 selected true
}
Clamp {
 name Clamp1
 selected true
 xpos -700
 ypos 35
}
clone $C56d8cc00 {
 inputs 2
 xpos -590
 ypos 39
 selected true
}
ContactSheet {
 inputs 4
 width {{width}}
 height {{"height / 4"}}
 rows 1
 name ContactSheet1
 selected true
 xpos 70
 ypos 183
}
set Nbd3e3c00 [stack 0]
Glow2 {
 size 32
 name Glow1
 selected true
 xpos 185
 ypos 219
}
push $Nbd3e3c00
Defocus {
 defocus 10
 name Defocus1
 selected true
 xpos -59
 ypos 217
}
push $Nbd3e3c00
ContactSheet {
 inputs 3
 width {{width}}
 height {{"height * 3"}}
 columns 1
 roworder TopBottom
 name ContactSheet2
 selected true
 xpos 70
 ypos 275
}
Viewer {
 frame 1
 frame_range 1-100
 colour_sample_bbox {0.78125 0.087890625 0.7822265625 0.0888671875}
 viewerProcess "sRGB (ACES)"
 name Viewer1
 selected true
 xpos 70
 ypos 299
}

Cheers,

Thomas

2 Likes

Hi Thomas,

thanks for your script.
I think, as it was in our case, the overall question is not only display referred “white”, but white could be as well any predefined Photoshop(display referred) color background.

I am not able to get a clean merge result with the PQ merge, when I am using my test render from that time and one of the solid backgrounds that are in the .zip file.

The energy scaling merge gives me a similar result, but still the edges look different. What we tried at the time was to replicate in ACES the merge behavior as Nuke would be set the default color managment.

Daniel

1 Like

It is a tricky one. It really comes down to the fact that peak white does not naturally occur in a photographed scene, unless something is completely blown out. 16.3 linear is 6.5 stops above 18% grey, so you are effectively placing your foreground object in front of a bright light. If you did that in camera, erosion of the edges of the foreground would occur.

1 Like

Clean is kind of depending on the expectations but yeah it is certainly not as neat as your suggested variant or the energy scaling. Ideally, you would render against white and call it a day :slight_smile:

3 Likes

Exactly and it is what we see here, except that merging naively does not produce the blooming you would get on the edges!

Thank you all for your tips and explanations!
Seems like there isn’t the one solution that keeps all the information of ACES but is capable of merging my render over a (ACES) white solid.
Rendering it with a white background in Mantra would definitely be best for overall quality but I have additional plans with it where I need it separate (and I can’t render in full quality twice).
Have to do some thinking on how to continue this, but as this is an exercise to use ACES I will probably force myself to get it done in ACES.

1 Like

Again…
A “fully white” solid (ACES) does not exist. You are working scene-referred.
A white piece of paper in a dark studio is still white, but you won’t see it without any light turned on.
How white the paper will appear in the camera depends on the amount of light and the exposure that you set.

What you mean by a “white solid” is the brightest white your monitor can display, so you are thinking display referred.

Try to imagine what you would do on a set/location:
Your plan is to take a “photo” of your scene, print it on a photo paper, cut it out and place it on a white paper again.

Best regards

Daniel

Only a quick iPhone experiment, but the real world effect of shooting against something that ends up display referred 100% white is clear:

4 Likes

Thank you again @TooDee
I understood what you mean and how it would work in real life. By ACES white, yes I mean a color that looks white on my display when I use the srgb output ODT.

The same scene rendered in linear srgb and comped on a white background (with linear to srgb gamut display LUT) gives me exactly the result that I am expecting and I was trying to replicate this in ACES.

In the end I need the cut out separate and the cut out comped on a color that looks white in srgb. Not possible in real life yes, but I already had the desired result, I’m simply struggling to achieve the same in ACES.

By changing the way that Fusion merges the animation and the background I was able to achieve that the “white” doesn’t destroy half transparent pixels completely but I am still investigating what the best solution for this will be.

Thank you all again for taking the time to reply to my post.

1 Like

You are welcome.

I am always looking for ways how to describe the differences between scene referred and display referred workflows.
It is always tempting to mix both worlds at once and some real world thoughts can help to think what we are actually trying to do in this moment.
I was trying to write about the difference Display- vs. Scene-Referred on my website some time ago.
When I read it again, I feel like I should rewrite everything again.


I find it very complicated to put it into words.

Always happy to help.

Greetings

Daniel

1 Like

Great thread guys, really informative!

1 Like

Thanks, I was about to do the same :slight_smile:

Just an update about this. Quite late as I’ve been very busy the last few weeks with actually paid work.

Turns out, this wasn’t such an issue after all due to several things.
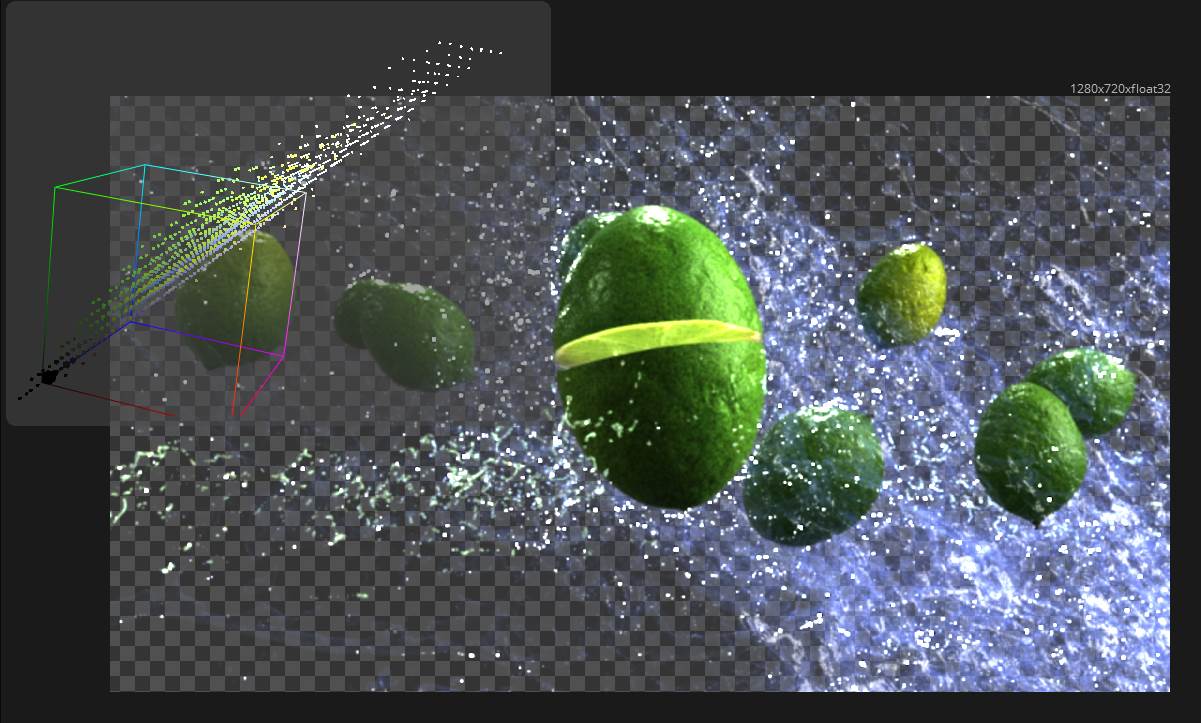
Yes, the Alpha edges are harsher but it’s not that noticeable in the actual resolution of 1920x1080. My initial Test was rendered in a quarter of that.
Then, I decided to place a bright but invisible light behind my scene in 3D, which made the white background I comp in later look more fitting.
At the same time, I am not comping in a background with values of 16 anymore but around 5. Which still looks very “white” and bright but not as artificial and it doesn’t attack the edges as strong. All in all, this looks more pleasing, so thank you all for your help and feedback!

But now the absolute biggest misunderstanding was Resolve. This was my first try in actually using the Fusion Page in Resolve (compared to Fusion Studio which I normally use for my 3D/VFX work).
In general, for this kind of project, it’s nice to use Resolve while prototyping, as I can quickly jump between shots and change the edit while instantly seeing the shots in sequence. BUT, it really screws up your colors if you’re not careful (at least in your viewer).

I set Resolve to use ACES in the project settings. This will apply an IDT to the footage you import through the Media Page and ODT in the timeline for viewing. If you jump into the Fusion Page it will automatically apply a viewer LUT called “Managed” which is a simple Gamut transform to sRGB, not the Output-sRGB ODT from ACES. This might work if you import the footage through MedaIn nodes (through the Media Page) but Resolve will be unstable when using the MediaIn node (as it has to do a lot of work to get this into Fusion). This is why I bypass the Media Page and I use the Loader in Fusion (it’s also easier to work with). Bypassing the Media Page will also bypass any IDT’s that Resolve will apply automatically.

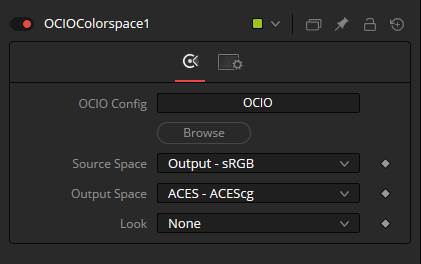
This means, while in Fusion, everything will look completely wrong. You can disable the “Managed” viewer LUT and activate the OCIO Color Space Transform viewer LUT and set it to transform from ACEScg to Output SRGB. Then it will look as it’s supposed to. But guess what, Resolve will reset this every time you restart it and default to the sRGB Gamut Transform again… That’s why it was so difficult to figure out why it’s sometimes working and sometimes not. (Fusion Studio does not reset or try to convert footage for you)
Funnily enough, you don’t need an ODT from the Fusion page to the Edit Page as Resolve will transform ACEScg to ACEScc and apply the correct viewer ODT (Output sRGB) when you pipe it into the MediaOut node.
I understand that Resolve wants to “do the work” for you, but it’s quite unclear what it’s actually doing (especially if it’s doing the wrong work). So most of my issues with ACES were actually misunderstandings between me and Resolve, as I am used to the simplicity of Fusion Studio. This is probably not even an actual “Resolve issue” because I might just use it differently from the intended way.

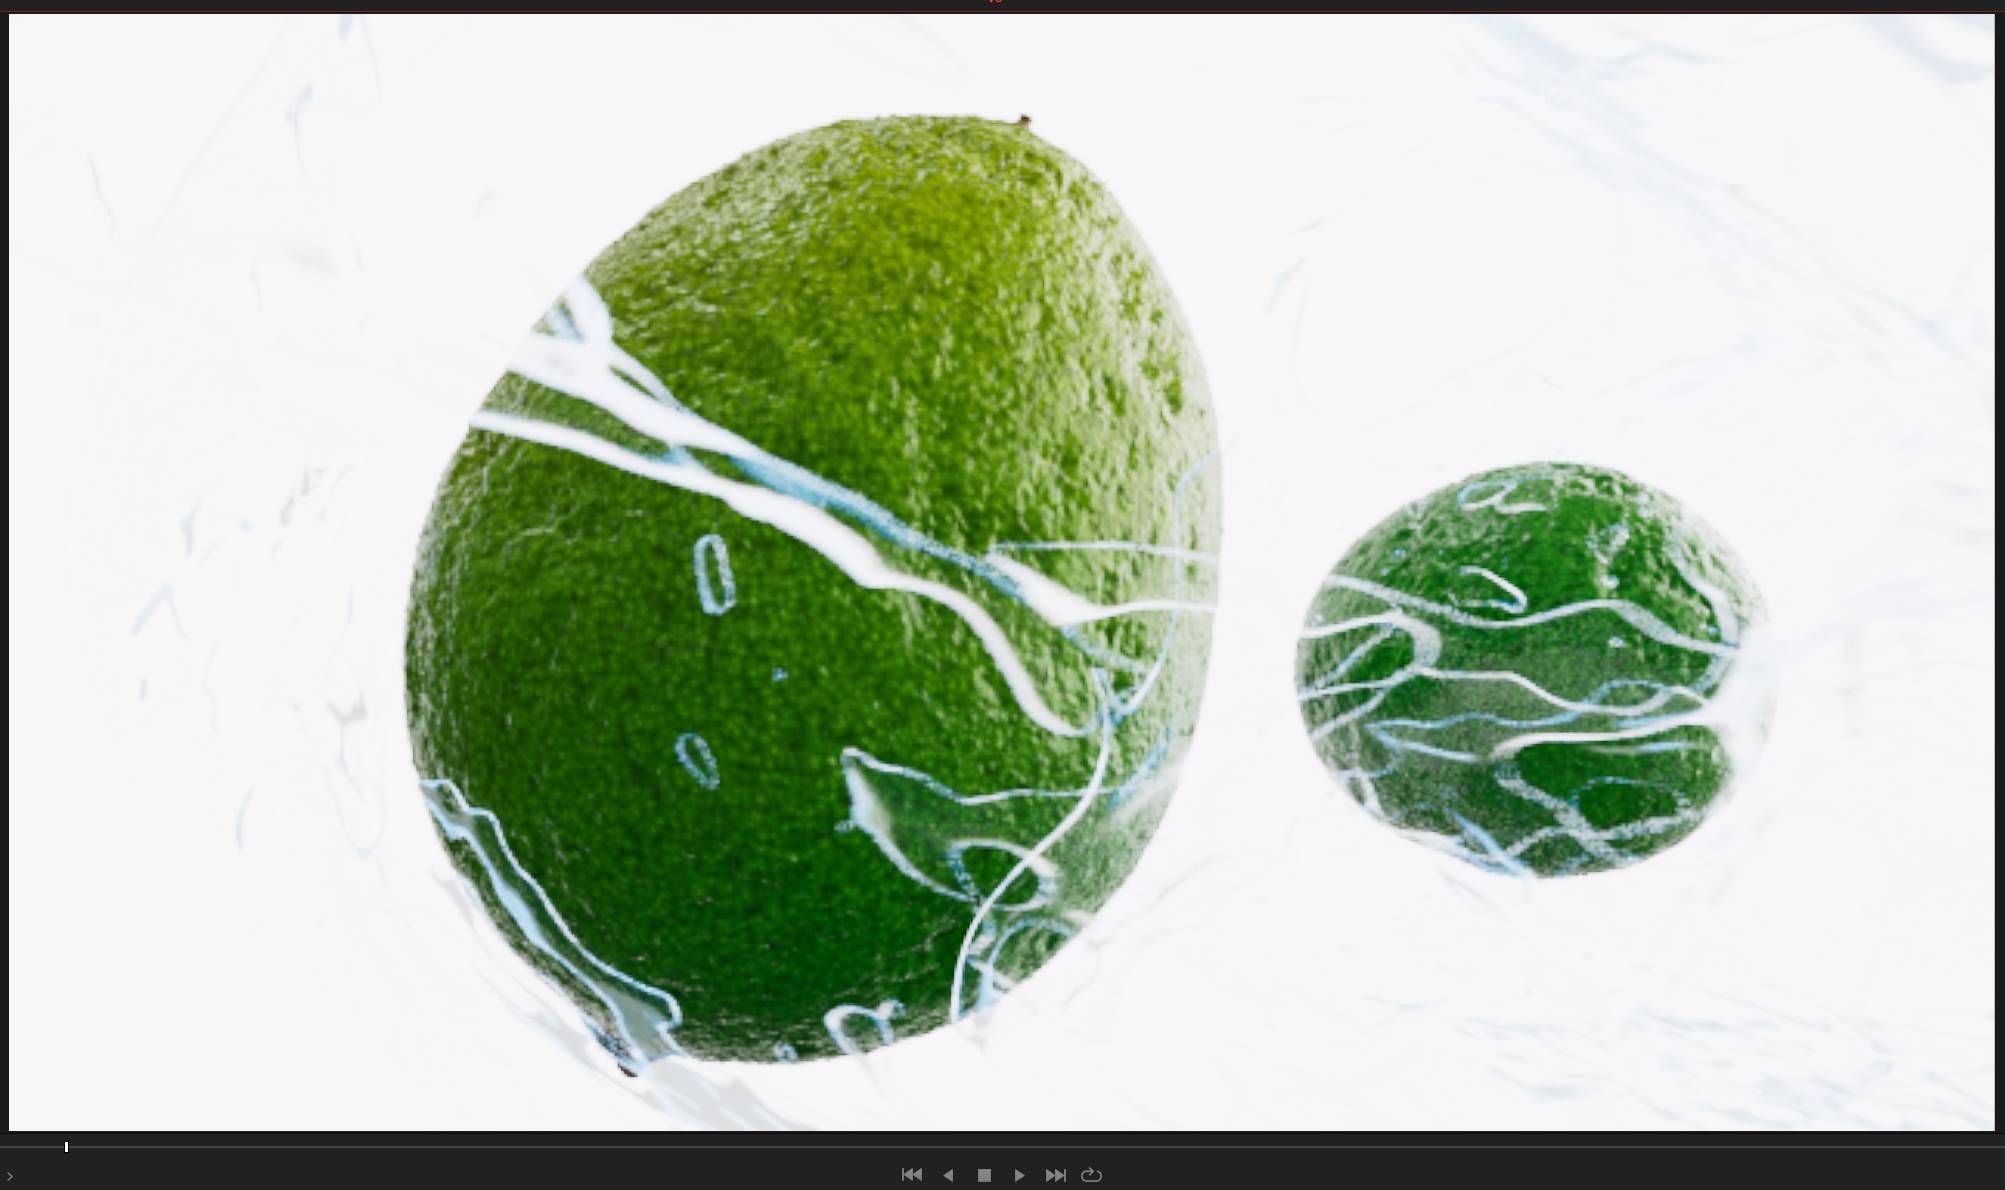
For a more visual example (but still not a final render as that is rendering in this very moment):
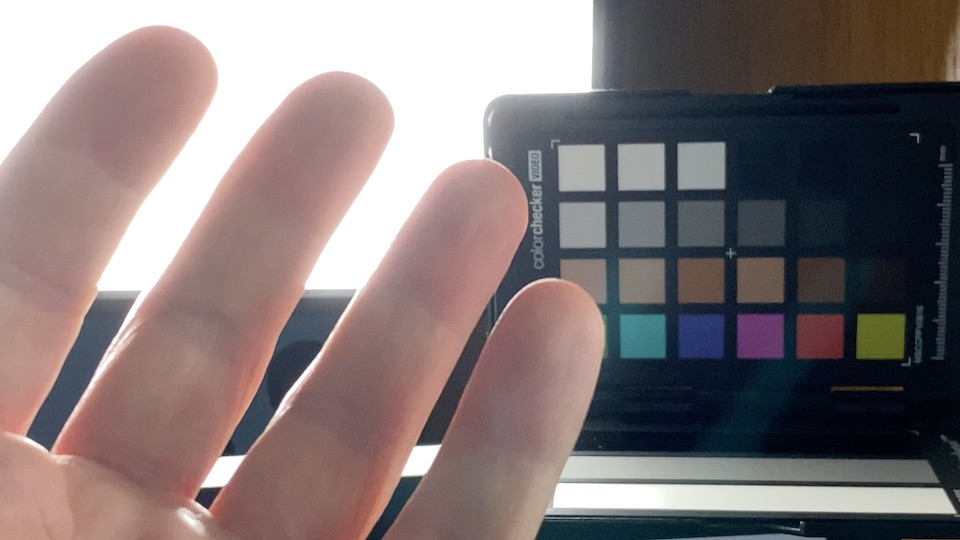
This is in the Edit Page, colors are as expected:

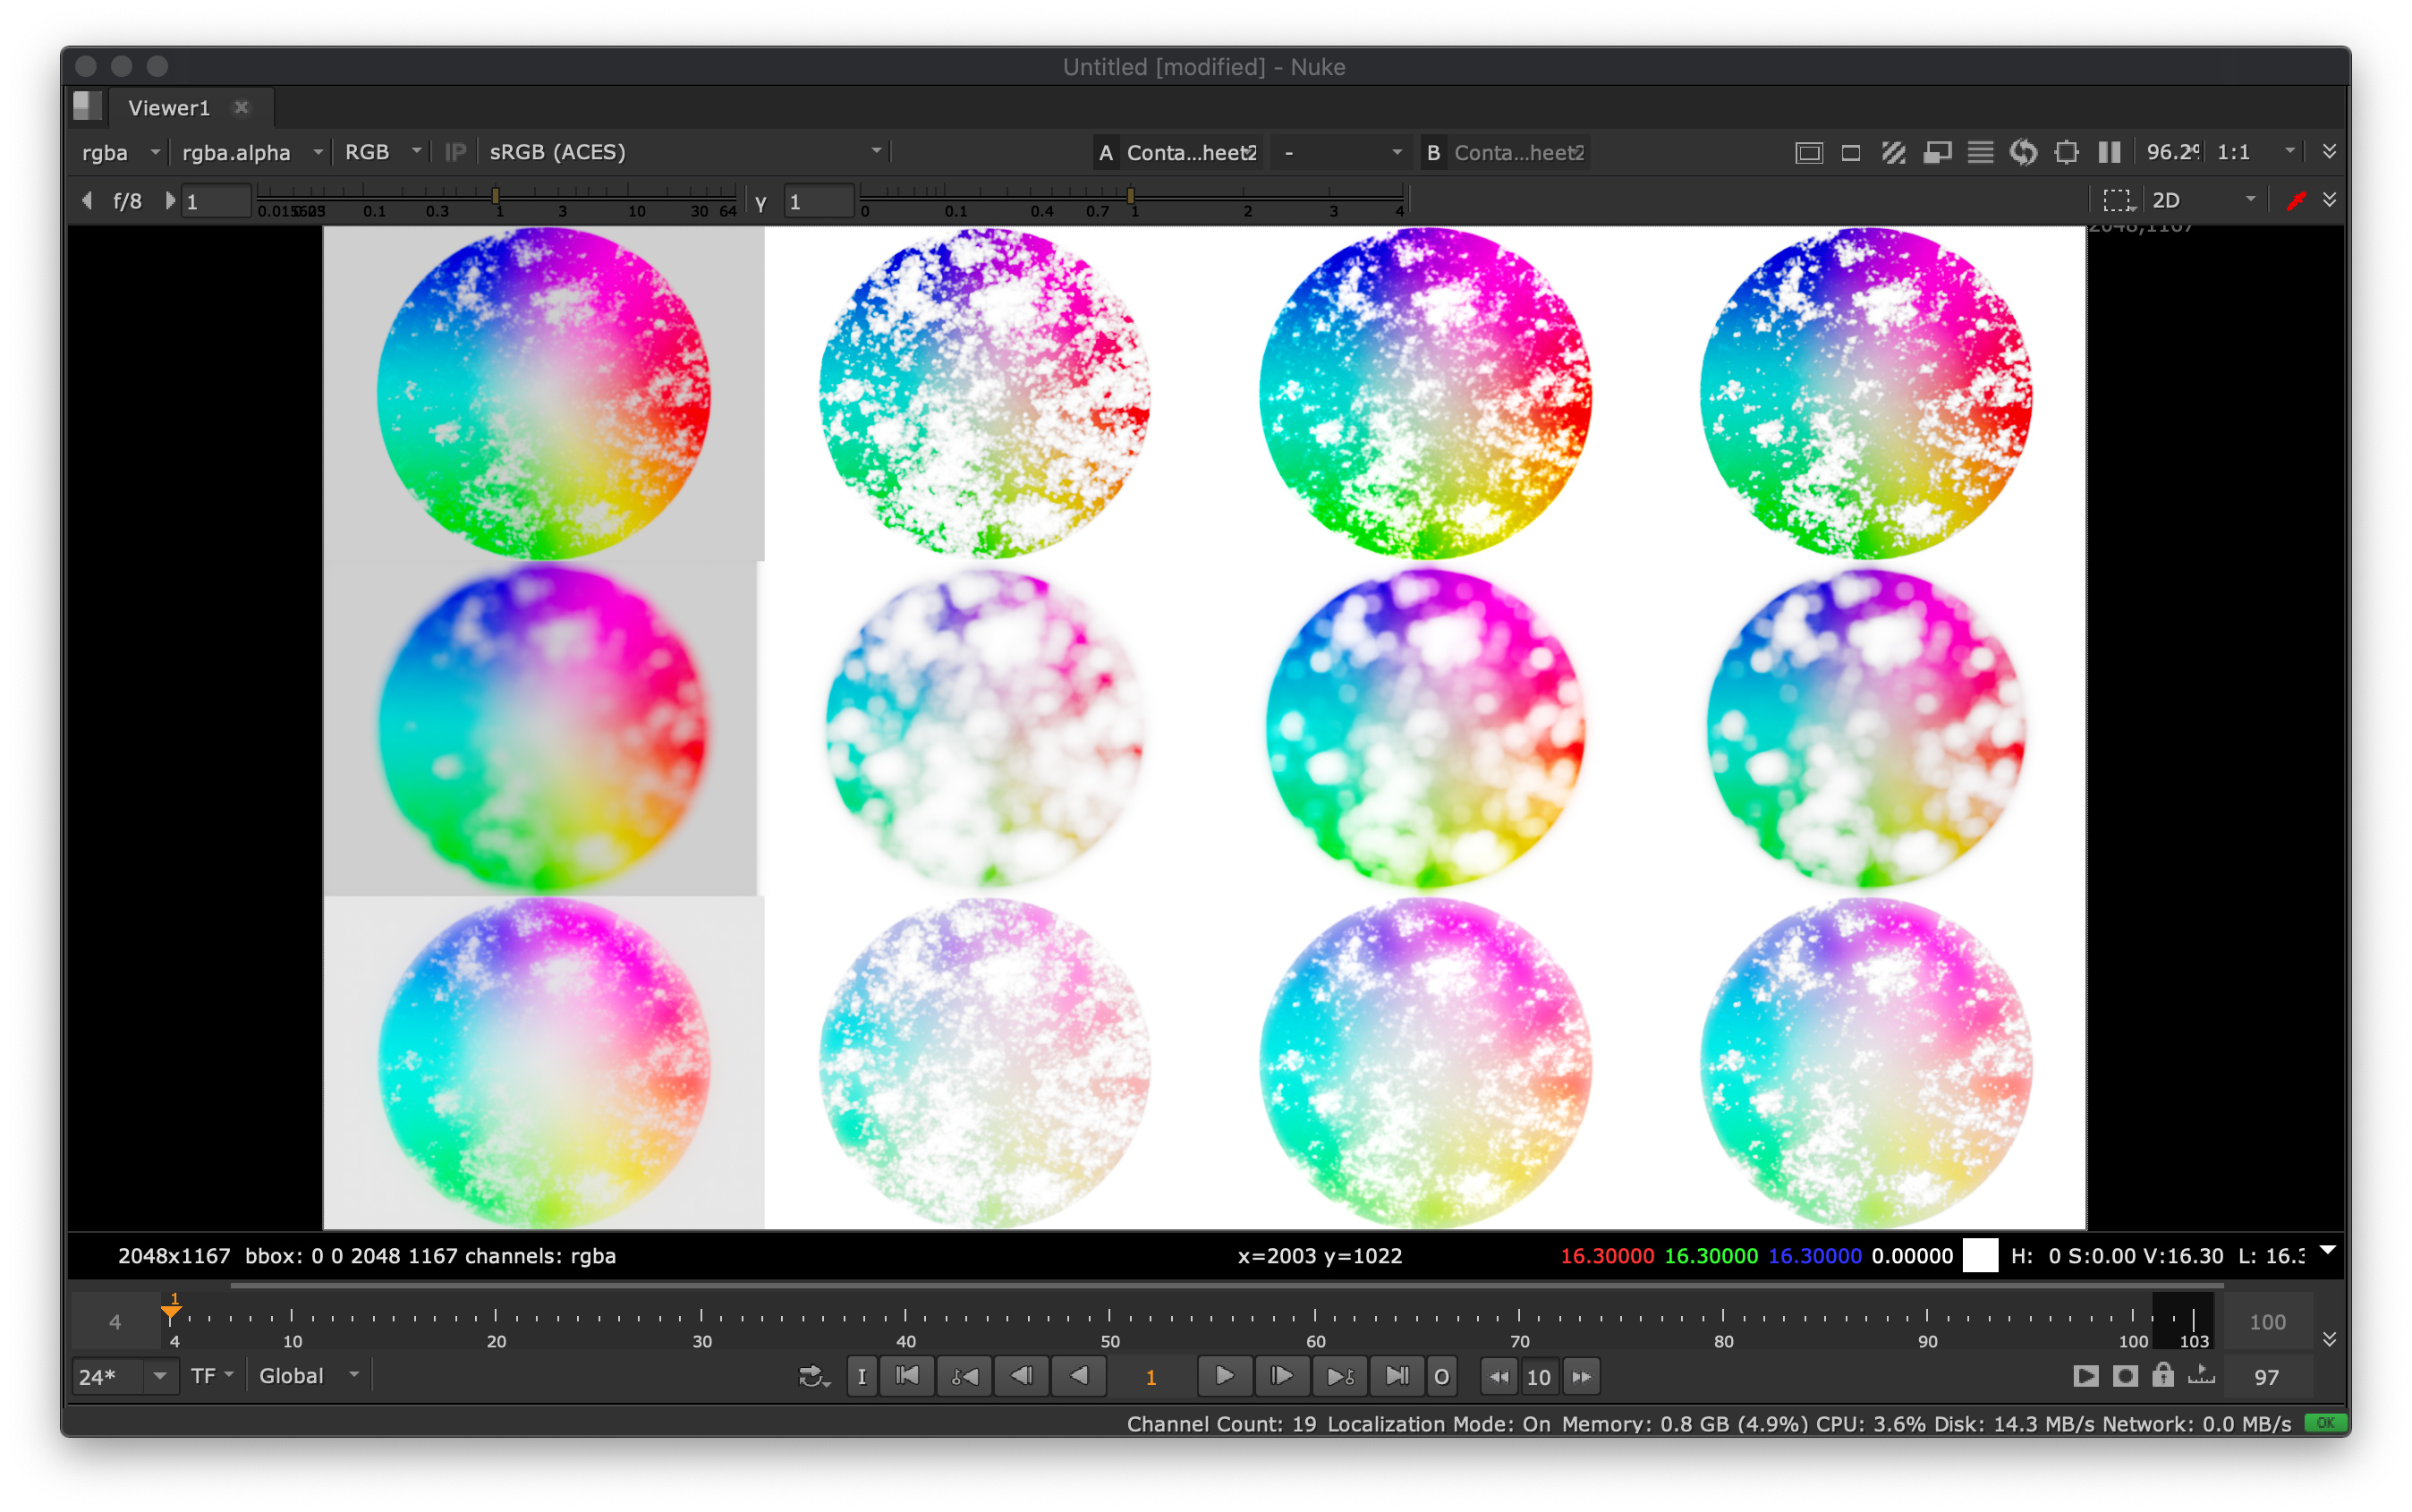
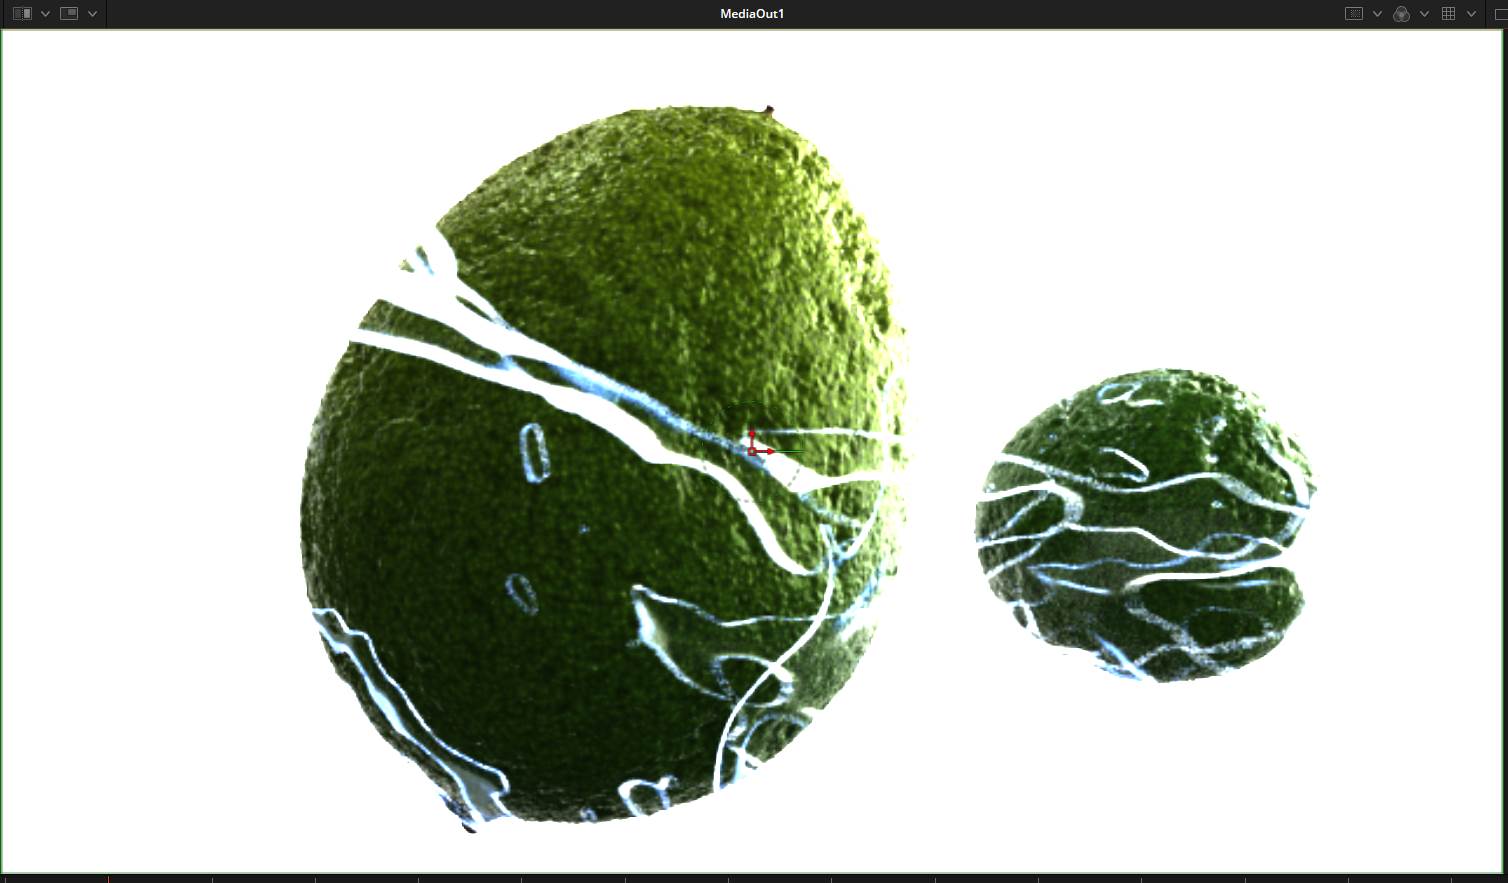
This is the same Fusion Clip but this time in The Fusion Page. This time Resolve didn’t activate any viewer LUT:

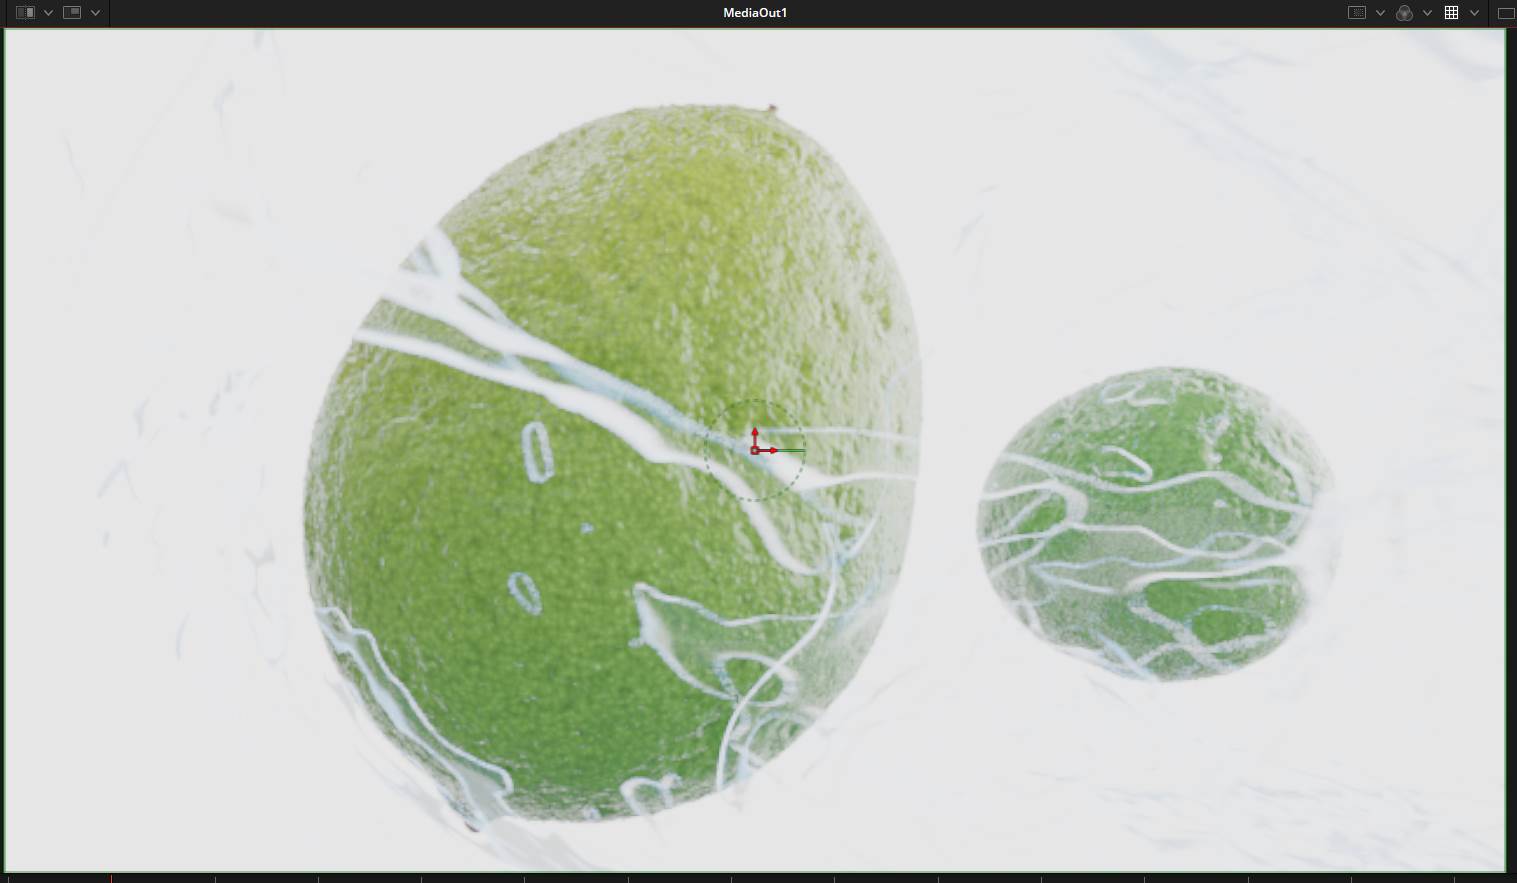
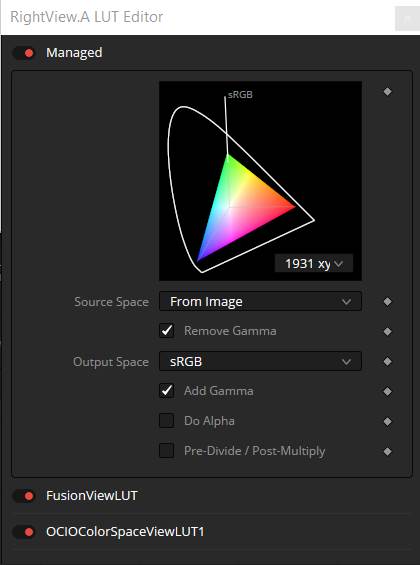
Activating the viewer LUT will default to my previous Setting which was an OCIO Color Space Transform from ACEScg to Output SRGB, but it will add the “Managed” LUT as well:

It doesn’t matter how often you create a new preset or how often you disable the “Managed” LUT. After a software restart, it will always add this again. And you need to change this for every single Fusion Clip if you want to see the correct colors.

I hope I was able to explain this properly in case somebody else has the same issue with Fusion in Resolve. Moral of the story? Don’t try two new things at the same time.

Again, thanks to everyone who added to this thread. I learned a lot about ACES and feel much more confident in using it. It’s particularly great because my 3D renders simply look better through ACES. I know there is a lot left to learn regarding ACES but at least it’s not this black box anymore.

1 Like

Thanks a lot for this great explanation ! I am sure it will be useful for many artists.
All best,
Chris