DaVinci ACES Workflow to Premiere Pro for final delivery in .h264

Hey everybody,

I’m aware this topic has already been discussed plenty of times (How do I output to vimeo (w/ rec709 gamma 2.4) without gamma lift? etc.) as I spent the last days figuring out what to do, I digged deep into the topic but unfortunately, I haven’t been able address the problem properly.

Background/Pipeline:

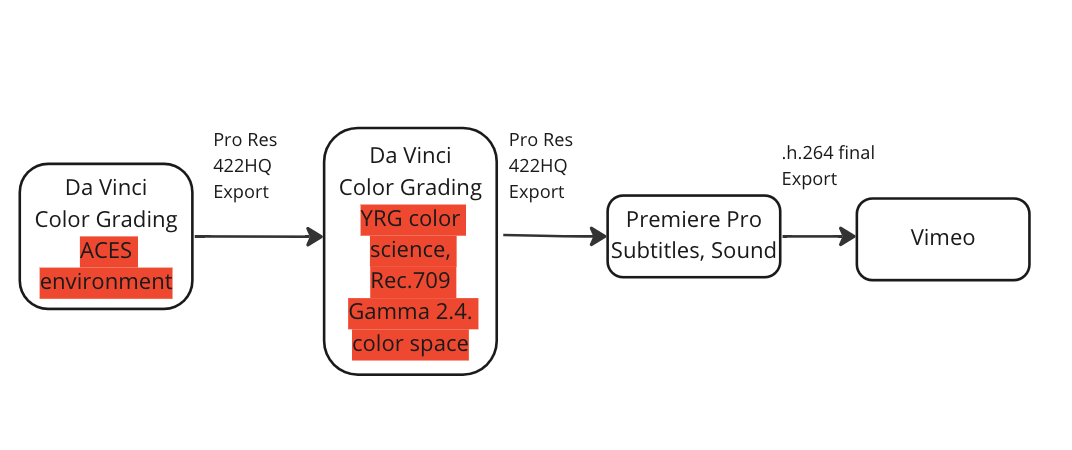
The editing took place in Premiere Pro, the grade in DaVinci, export back to Premiere Pro to put the graphics, subtitles and final sound all together. Final export in .h264 to upload on Vimeo.
(Dropbox - Pipeline_ACES.png - Simplify your life)

I color graded Rec.709 orginal and archive footage using ACES, here are the settings in DaVinci Resolve –

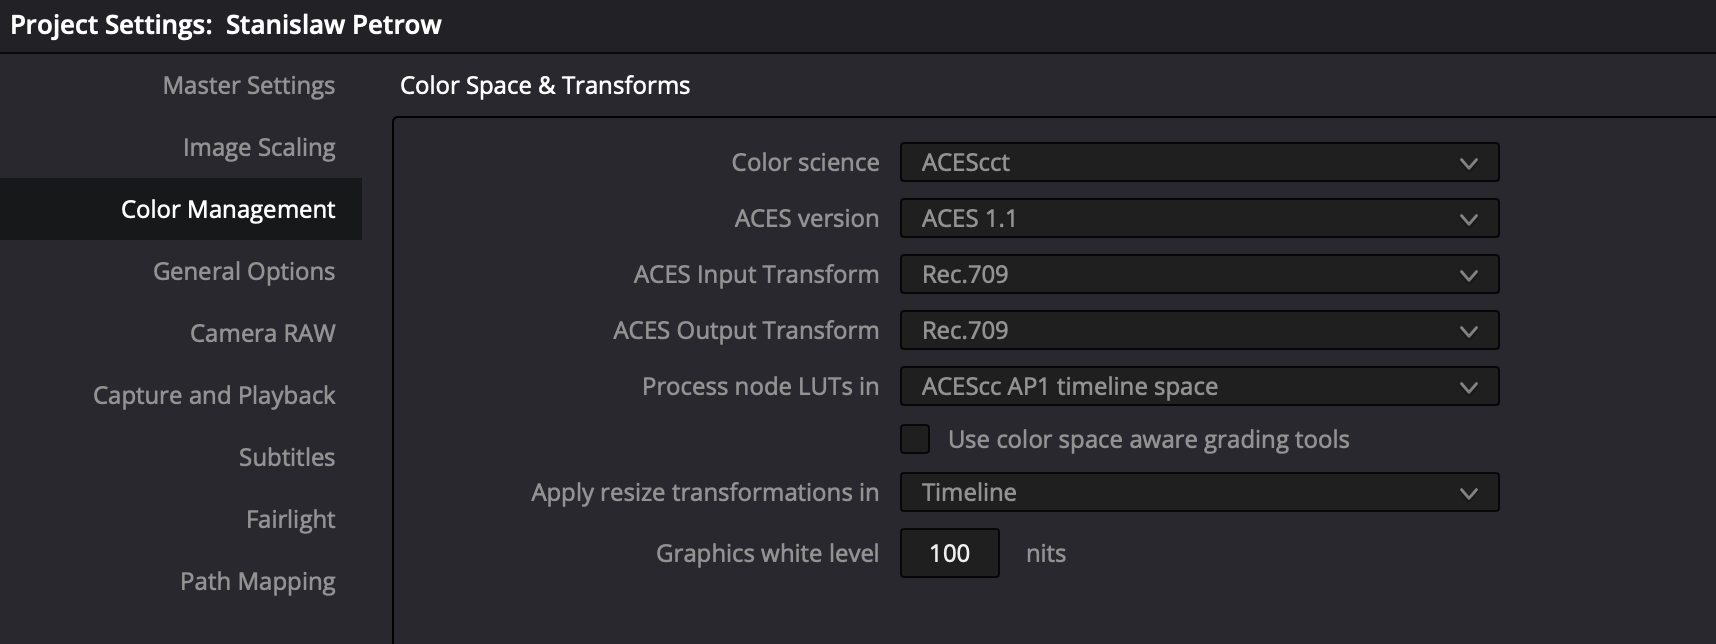
Learning that LUTs might not give you the freedom you need, I only used nodes, here is the node-tree –

And the input ACES transform –

The grade is now final but after exporting the ProRes422HQ and putting it back into Premiere Pro, I experience a major gamma shift which is not acceptable for final delivery.

Is there anything I was missing out regarding the workflow?

I read that there’s not really much you can do to avoid the gamma shift, but having spend a lot of time grading, I certainly don’t want to start from scratch again using a different project management setting.

How does the professional workflow look like from the status quo I’m experiencing?

I thought about putting the ProRes422HQ back into a DaVinci Project using the DaVinci YRG color science and Rec.709 Gamma 2.4. as the color space. Output color space same as timeline.
From there I just get rid of the gamma shift but won’t have to grade starting from zero.

Is this how the delivery usually takes place?

Please note, I’m a film editor and not a colorist, I just enjoy having fun especially with passion projects and trying out new approaches to get good results, so I’m not 100% familiar with all the expert terminus.

I’m excited and looking forward to hearing from you!

If what you see in Resolve doesn’t match what you see in Premiere one of the two isn’t managed. Are you using Mac? In Premiere you can turn on Use Display Color Management to enable the computer’s ICC profiling. The same can be done in Resolve but only with Mac systems. If you’re monitoring externally to a calibrated Rec.709 monitor, what you see in Resolve should just match Premiere unless your export data isn’t correct. I would double check if levels are correctly read as video and not data. I always export DNxHR 444 with Full Levels and Premiere uses it as such. Resolve allows you to overwrite possible misinterpretations but Premiere doesn’t have such an option.

When it comes to actually publishing video for web that’s of course another big challenge…
This is the only information that I know of that somewhat makes sense. But you’re so dependent on which browser and which platform it’s being published on too.

Thank you Shebbe for your quick response.
By changing the Display Color Management to GPU in Premiere Pro, I receive an image that looks like the initial grade from DaVinci, which is great!

Unfortunately, that doesn’t prevent Premiere Pro from exporting the final .h264 file with a Gamma Shift visible on different browsers and also on vimeo.

Since I usually grade in a DaVinci YRG color science space, the gamma-shift issue never occurred to me before. But after watching the YouTube video you shared, I realized it’s way trickier to get the final .h264 export looking like the DaVinci grade when grading in an ACES environment.

I think, for me, to match the final .h264 file with the master grade, there’s no way around other than re-importing the ProRes 422HQ to a new project using the DaVinci YRG color science and Rec.709 Gamma 2.4. color space and then changing Lift Gamma Gain to match the ACES grade.
This would be the quickest way to fix the whole video at once without touching each clip again.
The pipeline would look like this:

Please correct me if I’m wrong and if this is the professional way to handle the issue.

Thank you so much!

I don’t understand why you are getting differences in ACES vs YRGB (before exporting final file). If you grade in YRGB and setup manual management for ACES, what you see in your viewer/output should still be the same. Perhaps in ACES you’re exporting with different file tags?

Regarding exporting. I tend to hear different things from different people. Some change/convert their output gamma to 2.2 after grading. Some use a compensating LUT. Also stumbled upon this post, perhaps you get something out of it.

I hope, I understood you correctly and sorry if I am causing some misunderstanding.

It appears to me that the final grade (using ACES and exporting in ProRes422HQ) looks the same in the DaVinci ACES environment, the DaVinci YRGB environment as well as the Premiere Pro environment.

It’s just up until I export the final .h264 file out of Premiere Pro, I’m experience a major gamma shift when playing it back on QuickTime, Vimeo.
To trouble-shoot this color variation, is there a specific recommended setting when exporting my .h264 or should I use a different format for uploading on Vimeo?

Fun fact, I exported a .MXF DNxHR 444 out of Premiere Pro and Vimeo displays the video way darker and saturated than the .h264 file exported out of Premiere Pro.

Thank you so much!

Ah okay clear.
Regarding Quicktime and Mac that stuff is a little messy. I think the article I posted explains what’s going on there. There are also a lot of threads about this on the BMD Resolve forum where you may learn a thing or two.

That’s probably due to the data levels being read/converted incorrectly. In 8bit terms 16 would be mapped to black and 235 would be white, clipping the rest and increasing contrast/saturation on the rest of the data. You could verify this by uploading some color bars with grey ramp.

Thank you so much for taking your time and answering my questions Shebbe, highly appreciated!
I’ll do some more testings and am currently trying out the workflows mentioned in the article you posted above (The Post Process).