Hello everybody.
I’m very sorry, but after two days of research and testing, I still can’t get it to work.
I am completely new to the ACES workflow. I’m in my first project (Davinci Resolve 16.2) and everything regarding footage works really well.
But I can’t get graphics, logos etc. to look as they are supposed to.
Basically I would like to bypass any ACES transformation, so corporate logos and colors do not get altered.
If I choose “sRGB” as the input, the colors are at least similar to how the logo should look like but I get a really weird fringing on edges.
I have tried almost every combination of input, output and other settings suggested here in the forum, but I just can’t get it to work.
Part two of my question is Fusion graphics. Those colors will get transformed, too, but I have no way to select the input/output for this in the color-tab in Resolve. Do I insert an ACES-Transform node within Fusion for that?
I can’t help you specifically with Resolve - I didn’t have to work yet in Resolve with titles and graphics in ACES, but I am doing this with Autodesk flame. And I just recently wrote an article about how to deal with logos & titles in ACES there. You can find it here in the forum called “Flame & ACES”.
But in general - a scene referred environment like ACES “takes” your logo into the scene, that’s why it has to look different when it comes to colors and brightness.
When you use the standard Resolve Color Management (I think you can also call it no color management) then you work display referred the same as your logo which was also created display referred. So its not a problem add the logo on top of your camera footage.
The fringing on the other hand might be a problem of the scaling algorithms that resolve uses by default which are sharpen the images. When you change the filtering to gaussian the problem goes away - at least in flame.
I will look into the topic as well soon because I am also eager to know how to work in Resolve best in this situation.
Yes, this does make sense. I can’t have my project color space in ACES, or else all logos and animated shapes will get transformed, too. I have to set this up in the Color Tab individually with ACES transform nodes.
I wrote Tony Dae about this topic and was able to clear things up and he explains it also really well. You should check out his YouTube channel, he has some videos about Davinci and ACES. (Check him out)
The fringing only appears in some color spaces, I’m not sure if this has really something to do with scaling algorithms. But - bringing logos into ACES is how I understand it not practical anyways, so that won’t happen again.
In conclusion:
When working with different cameras, ACES really helps unifying the look without having to manually match cameras. This is the reason, why I did my research about ACES in the first place.
But ACES works for grading only. When working on a project with logos etc., I either have to transform the clips manually so logos etc. won’t get changed or I grade in ACES first and then import the graded footage into another project and there I can add logos on top.
Thanks Paul for pointing out the YouTube Channel - I will check it out.
I am writing on my website a lot about color management and ACES and I am always looking out for good explanations
what really scene vs. display referred workflow means when it comes to practical problems like logos or even subtitles in a day to day job.
there has been a couple of threads on this topic already.
I don’t know if you had a look at those.
Hopefully, you would not have to do that. Otherwise working in ACES would be a real pain. I have been doing a couple of tests with your logo and I cannot reproduce your issue. First one was with Nuke.
The trick as you already know is to use your ODT as an IDT for your logos. This process is called inverted IDT and allows to bypass tone-mapping for any logo you may have. If I may : did the client provide a proper logo file ? The JPEG I downloaded from this forum thread was very low quality.
thanks for you answer and testing the logo for yourself!
Yes, I had a look at both threads but I didn’t find a solution fixing this problem.
(Maybe I just didn’t get it.)
I’ve read about setting the ODT as an IDT in the other thread, but the logo still didn’t look right.
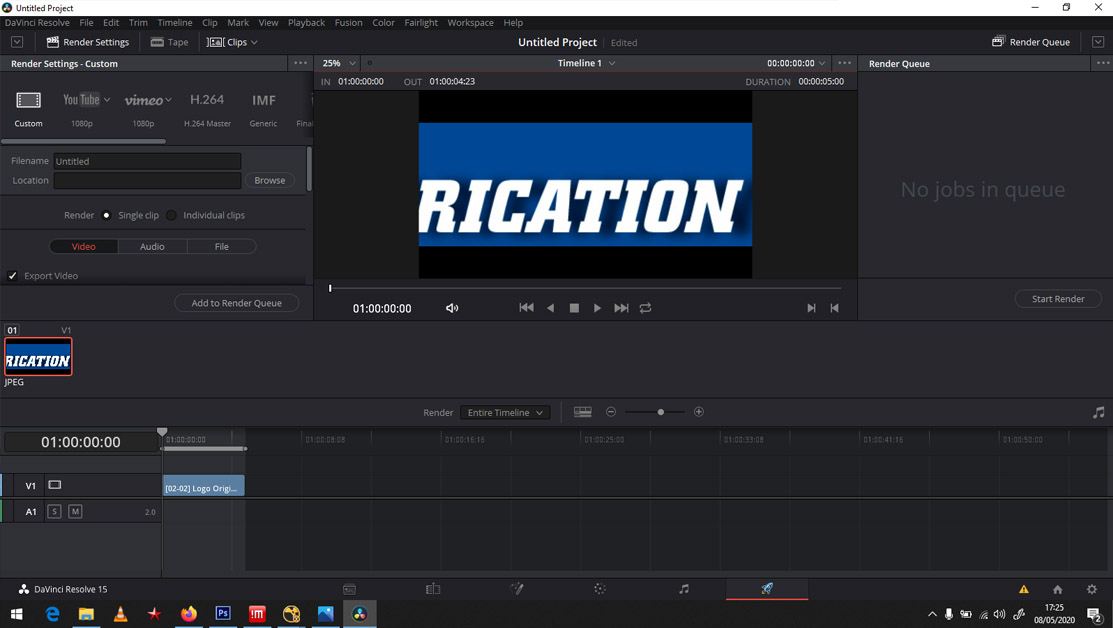
In my first post you only see a part of the logo as a screenshot.
The original Logo is a PNG. I you want to, I can send you the logo as a message.
Grouping and transforming my footage in the color tab is one more step for each camera in the workflow, but on the other hand it gives me more control and logos won’t even have to be inverted back.
If I find out something new while testing further, I’ll post it here.
Just to follow on this topic :
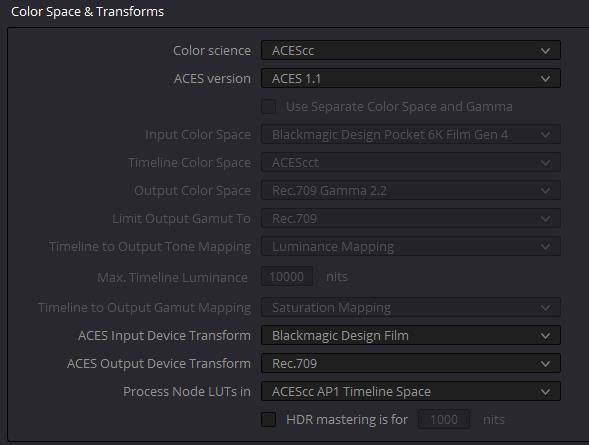
I think I was able to make it work. I have used the same settings as the one Paul posted in the color management / project settings from Resolve. But when I import the logo, I right-click on it and set the ACES Input Transform as Rec.709.
Logo seems to match Photoshop/Windows viewer with no artifact/visual bug.
yes you made it work. But with white values at around 16 you can’t blend a logo or a white title as you normally could do.
50% transparency will leave you still with a value of 8.
In Autodesk flame I would baking in the ODT on the timeline first and then add the logo. I was writing a post about this called Flame&ACES here on ACESCentral.
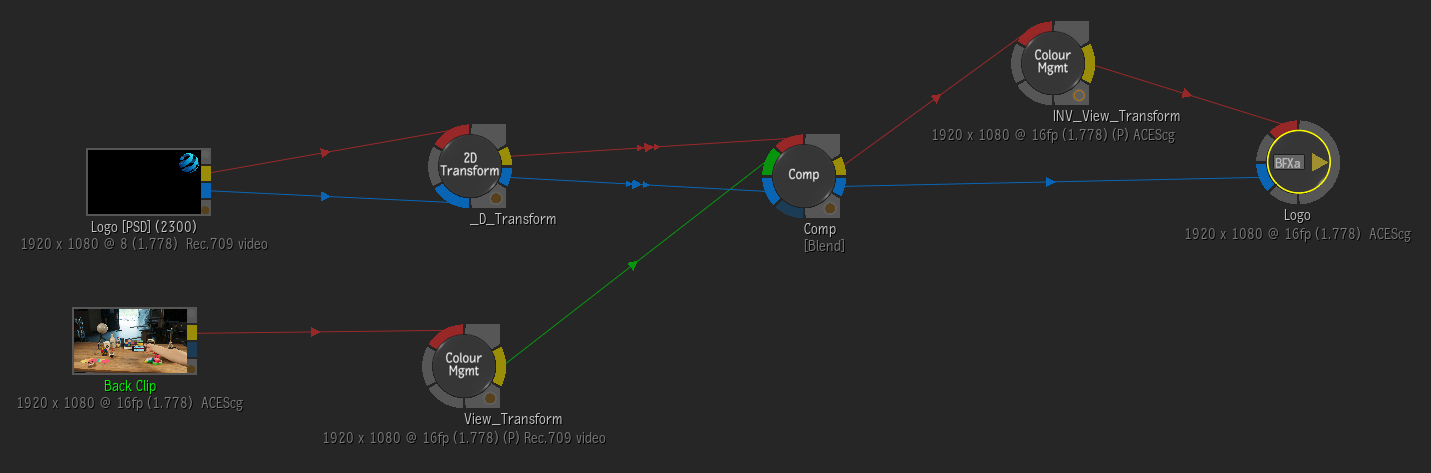
There a I also showed a “bad” way how to do it - which is basically this:
Temporally bake in the view transform, add the logo display referred and convert back to ACEScg.
With Resolve in ACES mode, you cannot out anything downstream of the Output Transform. However, if you use the OFX ACES Transform to “roll your own” ACES pipeline in DaVinci YRGB mode, you can do; although it does mean including the Output Transform in the node tree for each clip.
Thanks both for you answers. I am not much a Resolve user and wanted to experiment the inverted IDT for myself. What is weird to me is that I was never able to reproduce the “weird fringing on edges” on the logo (since it was the original reason for this post).
Maybe I’m missing something here but the issue seems to come from using one IDT (BMD Film) for all assets in your project. That graphic therefore has a most likely wrong IDT applied to it resulting in a color and contrast shift. I would suggest leaving the ACES Input transform in project settings to “No Input Transform” and then in Media tab setting the correct IDT for your clips (BMD Film) and correct IDT for that graphic (sRGB). That will have each asset properly colour managed. Doing so, I’m able to get correct result with the logo you included here. Did I miss anything obvious and you already tried that?
Thanks Goran. I had the same results as you with the logo and I don’t think you are missing anything obvious. Paul has moved on a new project now and will eventually let us know if he has the time to test it.
A round trip we use in our studio is to do all text (in credits, roll credits, etc…) compositing in a Resolve YRGB project after rendering the graded film in ACES. Then use, as @nick said, the OFX ACES plugin only for the rendered clip as ODT and in the case of multiple deliverables… the Colour Space Transform OFX for the text tracks.
Sounds a bit complicated but it works pretty well. If storage is your concern and needs a longterm archive, no ODT for the clip and ACES on the CST. Then delete the first render you did for the overlay of the text.
Well that’s very interesting.
I faced this issue in a feature film where all my psds texts gets overlayed with unusual colors no matter how i export it from photoshop (psd or png or jpeg) .
An easy way to control it in davinci is skip it by exporting an alpha .mov file so it can be easily readable by davinci as a clip and not a text also activating alpha channel in it to work properly.
A workflow that I use in After Effects might be applicable here. For starters, however, I would recommend avoiding any situations where logos or text are being composited beneath, and ultimately effected by, any color grading or IDT/ODT “sandwiches.” Especially text, since they seem to adopt a lot of aliasing depending on what else is happening in your scene. The interesting thing in AE is that you’re not forced to do all your ACES conversions and grading in your main comp. If you want to isolate any coloring and compositing, effects or footage in precomps and still be able to see how it’s gonna look in the final, you can simply turn any ODT LUTs into guide layers with each precomp. That way they don’t render in your main composite. This comes in handy then in those times when you do have any elements, corporate identity or typography that need to hold their brand integrity. You can dial in whatever you need in those nested comps and they integrate a lot better in the hero timeline. Not sure if the structure has any similarities to this in resolve or anything, but if there’s a way to not just compartmentalize those elements, but sort of selectively protect them, it seems to alleviate some of those wonky side effects in final composite. My 2 cents
i am new here, but i also run in this problems with logos/ci from clients in an aces workflow…
in AE it makes sense to isolate this from the “full” aces workflow, if they are direct in AE…
but what if you have to integrate this graphics to footage or cg-elements (i.e. rendering a logo texture into a cg-tv)…?
with an aces ODT your graphics will never match the original srgb ones…
if you do the inverse transform from ODT srgb to ACEScg you end up with extraorbitant raw color values, like 1.0 became 16.0 + the alphas are screwd up and your graphics become a light source in the cg-renderer…
or do i miss something?