Gamut Mapping Part 2: Getting to the Display

You sure? Is that a bad transfer? Remember that film has to be projected and then scanned by a digital sensor, which takes us right back to the start of skews.

Ha! No, I’m really not sure at all! I’m just naively asking questions. Appreciate your wisdom and insight!

I would not call it wisdom, just having suffered through too many digital scans.

Here is a simple example of the identical sequence, iterated / scanned / manipulated in subtly different ways. Which one represents the print stimulus that would end up projected on the wall?


yes, looks are a bit of mystery. I have posted here an example from TCAMv2 with the Look Vision applied. I think it is the best example I have seen of combining a “hue-preserving” DRT + Look. As you have certainly understood, generating such a look is a quite complex engineering task.

But if you want to play with looks yourself, you can have a look at ARRI ALF2 or RED IPP2 looks, which are downloadable for free. As a personal exercise, I have built some OCIO configs with their looks (87 of them for ARRI) to do some testing.

Here is an example of OCIO config :

displays:
  Rec.709 100 nits video dim:
    - !<View> {name: ALF2, colorspace: ALF2 - Rec.709 - 2.4 Gamma}
    - !<View> {name: 1110BlackAndWhite, colorspace: ALF2 - Rec.709 - 2.4 Gamma, looks: 1110 Black and White}

active_displays: [Rec.709 100 nits video dim]
active_views: [ALF2, 1110BlackAndWhite]

looks:
- !<Look>
  name: 1110 Black and White
  process_space: V3LogC_EI800_WideGamut
  transform: !<FileTransform> {src: ARRI_LL_1110_Black_and_White.cub, interpolation: tetrahedral}

Of course, you’d need to define colorspaces to make the config work. But hopefully you can get an idea of how looks are loaded in OCIO. I wish more softwares would implement them like Blender :

image

and I also have made a proposal to the OCIO UX group to give an easier access to looks. It is being discussed…

Chris

1 Like

I’d also like to throw out there that as far as this being a desired “look” of an image maker, it’s a pretty safe bet to say it never is. After all, If a film maker wants a shot of a red traffic light, they don’t want it to appear to be a yellow light which changes the plot!

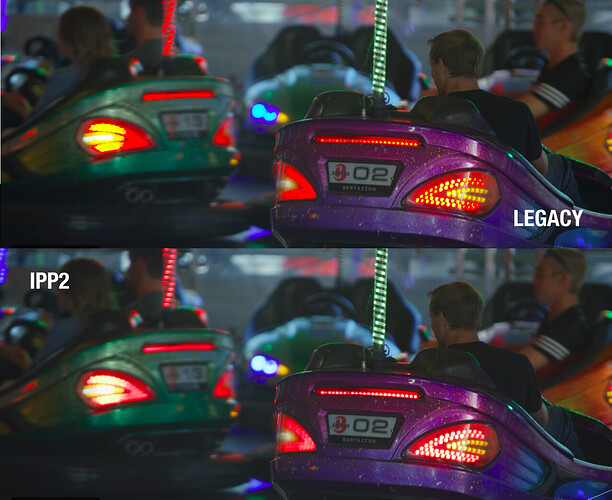
It’s more of what cameras just sort of do. My camera makes red lights… whether those are traffic lights, car tail lights, neon signs… all go to yellow and then white. For my eye all those lights were solid red with no yellow (or white).

Here’s a screen grab from the IPP2 video that seems relevant. The first “enhancement” they mention of IPP2 is “challenging colors are less likely to become overly saturated near the edges of the output color space” and the example they give is making red tail lights not going to yellow and instead doing the “chromatically-linear thingy” as you put it:
Hi,

Finally have 5 mins to comment on this one specifically! This is great to see, and I have been using similar numbers for quite a while now, actually probably closer to 15% but then it is not guided by any psychophysics experiments although I did play quite a bit with CIECAM02 and CAM16 at the time to get some hints.

Something to keep in mind though is that while a global colourfulness tweak tend to work fine, because the Hunt Effect is driven by the display Luminance increase, itself modulated by the tonescale, the tweak should be weighted somehow, e.g. shadows and midtones require different strength than highlights.

Cheers,

Thomas

Thanks Thomas, that’s quite interesting !

Just wanted to share some tests using the latest iteration of Open Display Transform : v0.0.81b3. I used to test thoroughly each version, then got hammered at work, lost a bit of track and finally found some time to test the latest publish. And I must say I am particularly happy with this version. I think this is the best one I had in my hands so far. Congrats Jed !

Here a few images you may have seen before using the default parameters (for sRGB display, with BT.709 primaries) :

Out-of-the-box… This looks pretty neat :

There is a “perceptual dechroma” check box in the node (that’s pretty cool) :

Blue bar, out-of-the-box :

Little cute Netflix’s monkey :

Eisko Louise rendered with the Treasure Island HDRI :

A blue to magenta ACEScg sweep (nice “hue-preserving” path to white) :

Little lego sailors (the one on the left with the moustache is Alex Fry) :

Mery and Zombie playing Star Wars :

RED Xmas (a LMT should help managing better the red tones) :

Selena Gomez’ colourful video clip :

And the sunny sRGB spheres (no accidental hue shifts, yay !)

The Nuke group looks super tidy to me (there’s like ~30 nodes in it) and the model super simple (there’s like less parameters every time). I am trying to have access to a decent HDR display (like EIZO) at work so I can compare both SDR and HDR in the same room. That’d make the review of this version even more complete.

Since the first version of the Naive DRT (back in January !), I think it has been an extraordinary effort from Jed to come with this great version. Impressive mate !

Hope you enjoyed looking at those frames like I did,
Chris

3 Likes

Hear! hear! @jedsmith the work you’ve done is nothing short of astounding!

I wanted to share some tests I did on images viewed through OpenDRT, K1S1, ALF-2, IPP 2, T-CAM, and ACES. These are using the ACES 1.2 OCIO config from the VWG GM.

First is the explosion image. OpenDRT and TCAM stay reddish, while the others go to yellow.

Here’s a sweep of kelvin temps in ACEScg primaries to see a bit more clearly what’s going on. Again, I’m observing that OpenDRT and TCAM appear to stay reddish, but the others move to yellow in the kelvin sweep.

Next I ran the images through some of @ChrisBrejon’s test renders. First the light sabers

The red in the ARRI K1S1 and ALF-2 are clamping. Uh oh! But the RED IPP2 looks good. In fact the IPP2 seems to behave a lot like the OpenDRT in terms of path to white. Here’s OpenDRT and IPP2 with the “Sunny spheres” looking nearly identical, with nothing notorious going on.

Here’s the two with the blue bar scene:

I’m hoping that possibly OpenDRT could be nudged to behave similar to IPP2 in regards to kelvin temps since the two seem to be birds of a feather in other respects.

Focusing on red, here are some further comparisons. Red Xmas the reds are behaving a bit differently on the two

If you compare the glow on the red in the bottom row of @ChrisBrejon’s “glowing spheres” I think you can see a bit more clearly what is going on. Is that perhaps connected in some way to what’s going on in kelvin color staying reddish?

I hope that’s helpful in some small way.

1 Like

@jedsmith
Seems like these OpenDRT DCTL don’t work in latest Resolve 17.2 build. Or is it just me?

@meleshkevich I just pushed a fix which should resolve the issue :crossed_fingers: – I keep forgetting that there are not supposed to be ; chars ending each line on the DEFINEUIPARAMS. Of course it works fine with or without on my CUDA Linux machine, but I hear it breaks on Metal. Give it a try and let me know how it goes!

I’m sorry! I just realized that I downloaded them in a wrong way (there was html code inside *.dctl files). So I guess the previous files were also ok! But anyway, these new dctl are working, thank you!
I’m on windows 10 (cuda)

1 Like

@jedsmith
Looks like this isn’t working as it should :slightly_smiling_face:
It’s the same for all log curves including ACEScct. Seems like only no curve (linear) works as it should.
Or probably I just use it wrong.

Also if I add 2 instances and turn on “invert” in one of them (and choose correct inputs and outputs of course) there are some differences. Is this expected at this stage of development?

And thank you for making DCTL versions!

Thanks for testing more than I did! You are indeed correct, the lin / log conversions were the wrong way around in the DCTLs. I’ve pushed a fix. Let me know if you see any other weird stuff!

Thank you! It looks almost correct now. I think I found one more thing.
There is something with primaries I guess. Maybe different chromatic adaptation, I don’t know. It’s different if I transform Alexa to ACES AP0 Linear (either with ACES Transform or Color Space Transform) and then add OpenDRT with ACES input, compared to just setting alexa as input in OpenDRT.

And I found a possible bug with ACES 1.2 (or just with Resolve implementation of it). If I go from Alexa to ACES using ACES Transform and then go back from ACES to csc Alexa, I get similar but not identical image. I mention this just in case. Maybe this is the reason.


By the way, I really like how it deals with those artifacts in the shadows with default ACES rec709 ODT, that can be seen after making image brighter with gamma operation.
I’m working on a music video right now. It has a lot of old VHS footage. So I use your awesome DRT in this project as inverse ODT to go from rec709 source to ACEScct. And then as a usual display rendering transform in the end.
This footage has gigantic colorful square blocks after compression. And it was a nightmare with default ACES rec709 ODT, if I tried to clip an image into the shadows in ACEScct. So I usually use k1s1 LUT based LUT as my ODT. But now I just changed this LUT to OpenDRT in the middle of the grading session

Yes I believe the difference you are seeing here is because of the different chromatic adaptation methods.

  • Path A (Arri LogC | Alexa Wide Gamut | D65 → Linear | ACES 2065-1 AP0 | D60 → OpenDRT) includes whatever chromatic adaptation method the resolve colorspace conversion node uses when converting alexa wide gamut to ACES AP0, and then a further chromatic adaptation performed in the OpenDRT node to convert input D60 whitepoint to output D65 whitepoint. OpenDRT uses scaling in Truelight LMS colorspace to perform chromatic adaptation.
  • Path B (Arri LogC | Alexa Wide Gamut | D65 → OpenDRT) has no chromatic adaptation performed because input whitepoint matches output whitepoint.

Very cool! Super curious to hear how this works out for you. Any and all feedback welcome :slight_smile:

Just tested it with a lot of raw footage. From creative point of view, and I know that it is not what’s the goal of the new DRT, - it looks less “cinematic” than k1s1, or current ACES RRT+ODT, or DaVinci tone mapper. And I have no idea how could I emulate the same behavior as a part of the look built under OpenDRT. I’m talking about nice effect on hue and saturation after S-curve highlights soft clip. So I hope there is a way to make somehow a good standard LMT, that could emulate this behavior and make it without any artifacts.
And for all the shots I’ve tested it with it looks better for me with perceptual dechroma turned on. Especially for the shot with bonfire at night. Otherwise it looks pink.

But since OpenDRT is not about artistic decisions, here are some artifacts I found. But probably it’s a too early stage of development to search for these artifacts. So I just wrote down everything I found just in case.

  1. Noticeable transition from saturated highlights to clipped highlights. It can be hidden with stronger hi dechroma slider, but skin tone becomes too desaturated then.

  2. In the darkest shadows blue becomes magenta before it clips into pure black. It can be visible after making image brighter with gamma. But at first I noticed it on a real footage, and only after that I checked it with LUT Stress Test image. This can be fixed with new gamut compressor applied before DRT though.
    I’ve also made some stills with another display rendering tools, for comparison (and with brighter gamma as well). All the tools have AP1 ACEScct on their input and Rec709 on their output.

DaVinci Tone Mapping:


ACES 1.2 Rec709 ODT:


OpenDRT:


  1. With perceptual dechroma turned on, there are artifacts in the shadows. It’s easier to inspect them with brighter gamma again. But even without it you can find a bright red dot in the shadows. And if I move hi dechroma slider to 0.0, they become way more visible.
    Clipboard Image (3)
    Clipboard Image (2)

  2. If the input of OpenDRT get very high values, they become pure black at some point. I’ve noticed this in a regular work at first, not from testing.

  3. If I set RGB weights all to zero, I get pure white solid.

1 Like

RGB weights to zero gives you a zero length vector which cause a division by zero which in turn cause all values to go to infinity. Infinity is usually displayed as max value after clamping.

1 Like

@jedsmith Is it intentional that defaults in params version are different compared to a regular OpenDRT version? Which one has “better” settings?
Thank you!