Utility-srgb-texture too dark

Hello everybody,

I’m scratching my head around ACES and srgb texturs so I hope somebody can point me in the right direction.
I’m using maya / arnold / Aces_1.0.3 / and megascan textures.
I know it is normal that the textures get darker when you use the Utility-srgb-texture but still I have question on the consequences.

I downloaded the ACEScg_ColorChecker2005.exr from AMPAS github.
My understanding is that it would help me get the correct exposure for my lighting.
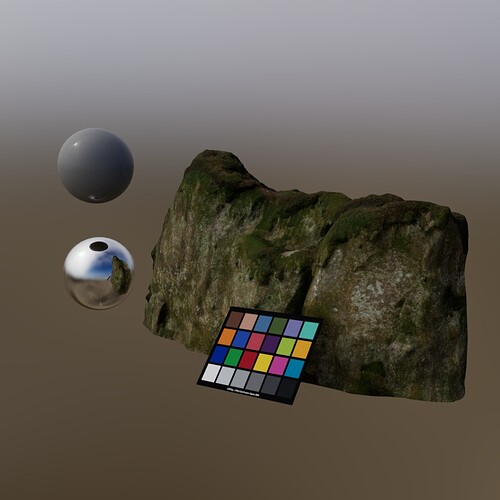
So I loaded the checker with ACEScg colorspace and plug it into the albedo of a new aiStandard with the weight at 1 and no specular.

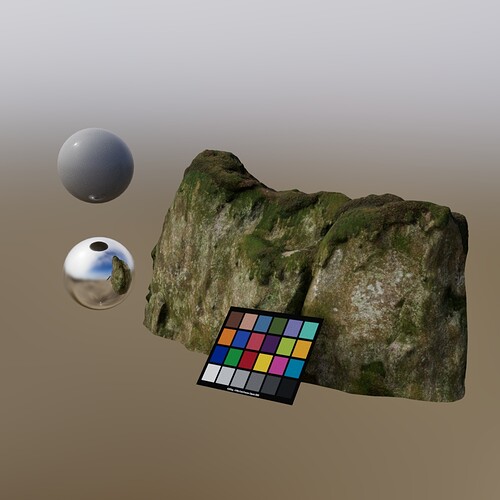
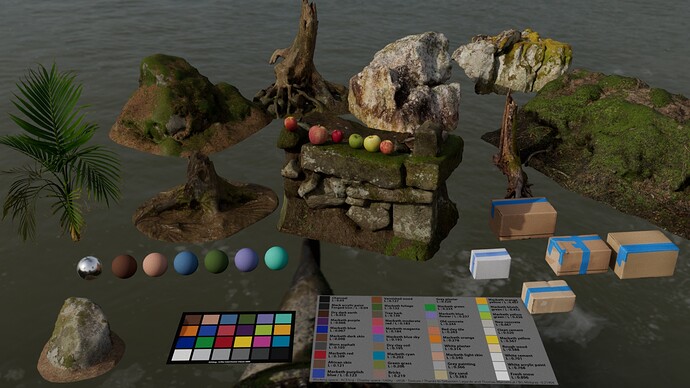
Below what I get. To me the rock looks too dark.

I read somewhere you are supposed to increase the amount of ligth in your scene.
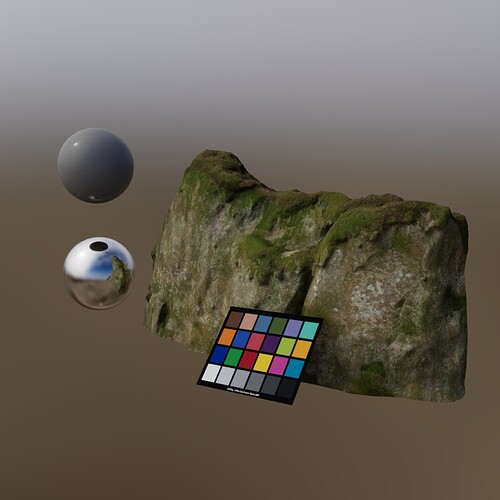
So I increase the exposure on my HDRI. But my colorchecker becomes overexposed, so I have to decreased the weight on the colorchecker albedo map to soemthing around 0.6. Below what I got:

And my last test it using Output-Srgb for the albedo. To me, it looks like it gives me a closer result of what I get with default export from Bridge to Blender, Bridge to Unreal, or Bridge To Mixer. The textures look less contrasted and less saturated, more natural.

So my questions below:
Is it normal my color checker in ACEScg look overexposed when I increase the amount of ligth to compensate the darkening of the Utility-Srgb-Texture ?
Should I increase the exposure of the texture itself instead ?
What can I use as references to calibrate my lighting and albdo intensity ?

Sorry if I’m not clear, thanks in advance for any help.
Gabriel
2 Likes

Welcome @gabriel,

Looks like the one from colour-science not AMPAS :slight_smile:

This is great and exactly what you should do!

This is where things become important. It might appear too dark, but do you have a photographic reference of the real-life rock with the chart right next to it? If not, you cannot really objectively say that the rock looks too dark. You might say subjectively, I don’t like it, it seems too dark.

Please do not do that as you will screw up your lighting! Once you have put the ColorChecker or the chart as a unit diffuse object in your scene, you should never ever touch it, it is the anchor for your entire world here and the only thing you can trust!

Unreal, by default, pre-expose/pre-gain the entire image, the multiplier is 1.45, so it is doing what your instinct told you to do and was one correct thing to do! :slight_smile:

You should not really do this, I know it has been recommended here and there but this is not a viable working solution. It might help to produce a more pleasing result but it is dangerous as it might/will destroy the texture to a degree and if the idea to do that is to compensate for the View Transform, then it simply does not work and I would really like for that approach to disappear.

Yes, this is normal, as you increase lighting exposure, all the values in the scene will rise, and ultimately some stuff might appear over-exposed.

You might although you need to be careful doing so to not create non-physical values. There are a few albedo charts around, @ChrisBrejon made one recently that will help you here. It would be interesting to know if Quixel/Epic has some colour char shot with the asset, the texture could be processed incorrectly, you don’t really know at this stage.

A good HDRI, e.g. Unity Supplemental Material and/or a Physical Sky.

Cheers,

Thomas

3 Likes

Welcome Gabriel,
Thanks for your first post!

Steve T
ACES Admin

Hello guys,

very interesting topic ! Thanks @Thomas_Mansencal for your clear answers (as always). Yes, I have done an ACEScg chart that I have posted here : ACEScg for Animation feature and further questions

A few things about this albedo chart. I should rather have named it : base color chart or diffuse reflectance chart. I have only realized (after doing the chart) that the albedo actually includes the specular reflectance.

Let’s take charcoal as an example. There are many charts out there with different values : 0.02, 0.03 and even 0.04. This difference of values is explained if specular is included or not. So far, best values that worked for me for charcoal were 0.02 in the base color. 0.04 being the actual albedo value (which includes spec basically).

Unreal has done a really good job with this. Please notice they do use the words “BaseColor” and not albedo. Here is a link : https://docs.unrealengine.com/en-US/Engine/Rendering/Materials/PhysicallyBased/index.html

This also means I need to update my chart with more accurate naming and values.
And welcome Gabriel !

Thanks !

1 Like

Hi Gabriel,

I just wanted to add two little points that I run into as a Flame/Nuke Compositor when I receive 3D renderings, especially when the 3D artist is not used to work with ACES. I hope I explain it okay.

First the temptation of using Output-Srgb because the texture looks “right” at first.
I try to explain it this way: Think of the texture as a poster on a wall (srgb-texture) - ACEScg has a bigger gamut than sRGB that’s why the poster doesn’t look so colorful. Your poster can’t have all the colors that you can see in nature. The diffuse values of the poster are between 0-1, but 1.0 is not white on your display anymore it is just a scene referred light value viewed trough the RRT&ODT. In your case sRGB. If you find it too dark, just gain it up (multiply) or you can add to lift all the values of the texture. This is how colors on a poster will also appear when you film them with a DSLR for example. The maximum white on the poster is always white on your photo (in this case your viewer), but how bright the white will be depends on the exposure of the scene.

So using Output-sRGB will set a white on the texture or poster to over 16. This is a specular highlight value on a normal exposed image with the color chart that you are using. The only way I can archive this in the real world if my poster is at a bus-stop for example and has a light source behind it. Now the poster or texture is a light source by itself. This doesn’t make any sense to do this with your grass and soil texture on the rock.

The second point is the dynamic range of the HDRI that you are using, especially when you work in ACES or another view transform like FIMIC from Blender. In the past we viewed the 3D render and the composting through a SGB gamma tone mapping curve.
1.0 was full white so you had to be careful not to overexpose you rendering or comp (soft clip was helping you there). Working with ACES needs higher values to really light up your scene and no clipping or clamping of values. A simple HDRI will maybe clip/clamp in the lights or the sun at 3.0 or 300.0 depending how it is captured. But I need to have values of around 100.000 or more to mimic a sun with a clear sky on an outside captured HDRI around noon. Otherwise my lights are far too weak. I was testing this out with a Theta-S from Ricoh vs. a DSLR with a pano head and most important - a ND filter.

You can find a lot of examples here: https://www.toodee.de/?page_id=1309

Please try to use a HDRI with proper light values. The one in your rendering looks artificial? If you want I can upload you the one I was using here (https://www.toodee.de/?page_id=2258)

Best regards

Daniel

Thanks for all the answers, it was very helpful!

As advised I stopped messing with the ColorChecker and used it as an anchor.
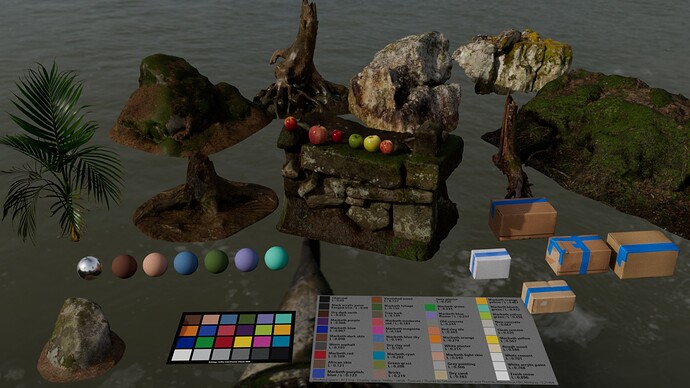
Bellow a new test. All the assets still from megascan with the albedo weight set at 1 and a little bit of specular.

It is only a feeling but to me some assets look good (the apples, the cardboard boxes, some of the rocks) and some assets looks too dark. I add an aiColorCorrect with a gamma at 1.3 for the dark ones.
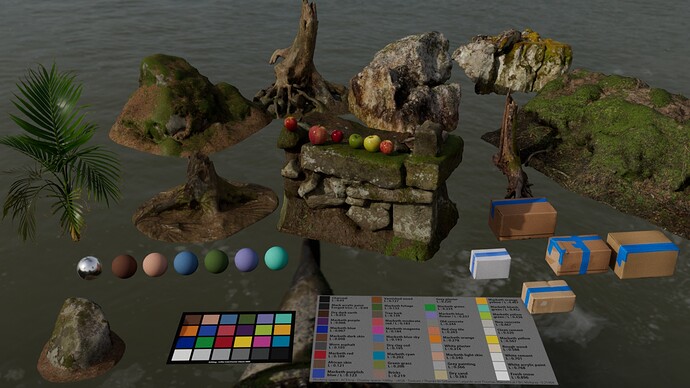
Bellow the result.

Now, to me, everything looks correct.
I don’t understand why I had to color corrects only some assets. Either they are not all calibrated the same, or my perceptions are just wrong.
I realize that when it comes to color; perceptions are note very reliable, so I would be glad to have your opinion.
My plan in the future is to color correct the asset I judge too dark and hope I’m not messing with accurately calibrated data for nothing.

And about using Output srgb I get it now why it is wrong.

EDIT:

I realise that all the asset are “looking good” with default export from Bridge > Blender or Bridge > Mixer.
So they must be all calibrated the same wich make sense given the quality of Quixel work.
I add the 1.3 gamma color correction to all the albedo map and it look closer to what I get in Blender / Mixer ect.

So Is it a correct workflow to add an approximative 1.3 gamma color correction after all the color map ? Or I’m still missing something?

2 Likes

Gamma is a part of the display tone mapping process, if your HDRI is properly linearized and your textures are too, then you don’t need any gamma correction “inside” the 3D scene. It’s just a guess, but I think there is simply lacking enough light in your scene so that you are happy with the result.
Often the HDRI is to “weak” or gamma corrected or interpreted in a wrong way - or the textures.

Please turn the HDRI off and use a simple point light to light your scene.
I tried this out myself on another article " 2.2. Understanding Gamut with ACES and Blender" and realized that my light levels were simply “wrong” in the beginning.

Daniel

1 Like

It is hard to know without having knowledge about the image processing pipeline used at Quixel to create them but they indeed look a bit dim here almost feel like decoding has been done two times.

If the data is correctly processed and imported, you should not need anything, it should look just right!

I would bring up the issue on UDN.

Cheers,

Thomas

@TooDee I’d love to test your HDRI if possible. Thanks !

Like Christophe, would be very happy to have a look too.

I get similar results.
From my understanding of you article Blender and ACES, a bad hdri would give me weak shadows, bad reflections, blueish sky tint, but a color chart could still be used to set the exposure accurately. The current HDRI is the one Thomas linked [here](. Unity Supplemental Material)

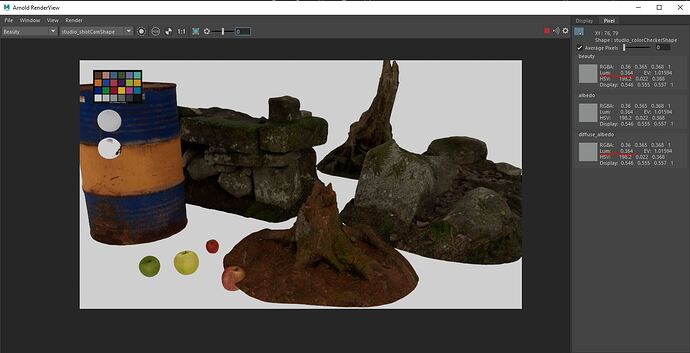
I guess they are just a bit too dark. With the Arnold render view I did some averaged samples on the albedo AOV, and the luminance is lower than similar materials from Christophe albedo chart.
0.076 sampled on wood (Tree bark is 0.139)
0.055 sampled on moss ( Macbeth foliage is 0.132)
0.068 sampled on ground (dry dark earth is 0.053)

So I think from now I will just increase the exposure a bit.
Thanks very much for all the help.

Yeah seems like they are not very well exposed, underlines the importance of calibration :slight_smile:

Cheers,

Thomas

Hi,

I uploaded three files and the link is valid for 30 days:
https://my.hidrive.com/share/e80redu..j

All files are EXRs in ACEScg
IMG_6912_AFF_Bal_acescg.exr (the ColorChecker - balanced to the 18% grey patch - AFF=Affinity Photo)
IMG_6916_NK_BAL_acescg.exr (a backplate - balanced with the same values as IMG6912 - NK= Nuke)
IMG_6729_CapOne_BAL_RO_RET_sun3_8k_acescg.exr (the original HDRI was clipping at around 30.000 - over a very small soft radial mask I multiplied the center of the sun with a factor of 3 to get values around 90.000) RO=Reorient the HDRI to the plate, in blender I added 5 degrees more to get a better shadow angle to the floor)
This files needs to be a 32-bit full float EXR, the others are 16-bit half-float.

With shadow catcher object in Blender I measured the darkening factor of the shadow and compared it to the ground in backplate where hedge casts a shadow on the floor.

I am looking forward to hear how you like the results with this HDRI.

Daniel

1 Like

Thanks @TooDee ! I am looking forward to do some tests with them !

Chris

Hello @gabriel

@ChrisBrejon just sent me this interesting forum post. I’m a CG Lead (Lookdev & Lighter) and owner of my own independent studio and do work for Quixel as well. I’m myself using ACES for my CGI work with Megascans and I do have a few questions:

  1. Are you using full EXR Megascans assets? From the IDT you have mentioned, it seems that you are using JPG files. EXR files which are available for all Megascans users, will contain much more information and will allow you to tweak (for artistic or reference matching purposes) with more freedom and better end result.
  2. The export from Bridge should not affect the textures. It is true though, Bridge has an image processor built in but if you do not do any file format conversion, this image processor will not be used (and has some known issues that we, Quixel, will fix in the future).

If you have any questions, feel free to reach out here or on the official Quixel forum that I moderate as I’m also a moderator and technical customer support agent.

Best

2 Likes

Hello kn9,
Sorry I missed your reply, but thank you for the help.
1)I tried switching from JPG to exr but I have very similar results in both.
2) I also have similar results if I don’t use Bridge at all and do the shader setup by hand.

I’m not even sure that there is a problem at all. Maybe it is not too dark. I don’t have the originals shooting photos so I can’t compare.

Below another example. I add a basic dome light with a constant white color.
The ColorChecker is well exposed. The megascan assets have a basic shader with albedo weight set to 1.
Is it looking correct to you? Do you have a different result on your side?

I’m considering to just slightly increase the exposure of the textures that look too dark.

Hi all, I have a similar issue I am facing.

I am using Maya 2020.3 MtoA 4.0.4.1 (Arnold Core 6.0.4.0) / ACES 1.0.3

I have an 8bit image that I am trying to render by simply plugging it into an aiFlat shader. I expect the render to look exactly the same as when I view the image in Photoshop, however that’s not the case.

Why is that the case? I thought the point of “utility-sRGB-texture” is to convert the 8bit image into ACES color space so it gives the same result as the original srgb image. Is that not so?

Also if, e.g. I am creating some textures in s painter and export them as 8bit images, how can I have them look correct (the same as what I see in s painter/photoshop etc)?

Thanks,

Haris

That is not so. :slight_smile:

The intent of the utility-sRGB-texture is for albedo/color texture maps. These should be viewed through the ACES Display Transform to see how they will appear. So you would want to view these that way in both your paint program (Mari, Substance Painter) and in the renderer (Maya) and in comp (Nuke). That way what you see in Substance Painter looks the same as what you see in Maya and Nuke because all are viewed through the same Display Transform.

Photoshop does not fit well into that texture pipeline. I have a tutorial if you want to take a look, FWIW.

When you say you are using an AiFlat shader it sounds like you are wanting to make a self-luminous object. For that you could use the inverse of the Output transform, but you need to be aware that this will create light emitting values.

Thanks a lot for the explanation Derek! This really helps. The point of using aiFlat was simply to see the result of the image/color space without any other shading parameters, e.g. spec etc.

1 Like